Yeastar - PBX - 2FA using Authenticator Application for PBX
Configure Two-factor Authentication using Authenticator Application
Prerequisites
You have installed one of the following supported authenticator applications on your mobile phone.
- Google Authenticator
- FreeOTP
- Twilio Authy
- Microsoft Authenticator
Procedure
- Log in to PBX web portal, click your account at the top-right corner, then go to Change Password & Security > Security Settings.
- Select the checkbox of Two-Factor Authentication.
- In the pop-up Password window, enter your account password and click Confirm to verify your operation.
- Select Authenticated by Authenticator.
- Add your account to the authenticator application via either of the
following methods.
Scan QR Code to quickly add the account
You can quickly add your account to the
authenticator application by scanning the QR code
provided by PBX.
- On your mobile phone, open the authenticator application, and select to scan QR code.
- Scan the QR code shown on PBX web portal.
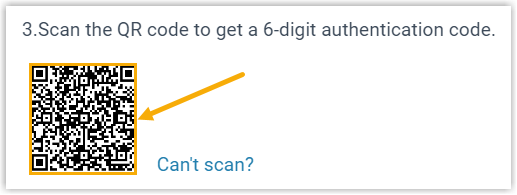
Your account is added to the application automatically, a 6-digit authentication code is shown.
Manually add the account
In case you can not scan QR code, you can
manually add your account and enter the secret key
provided by PBX.
- On PBX web portal, click Can't scan beside the QR code.
PBX will generate a secret key, note it down for later use.
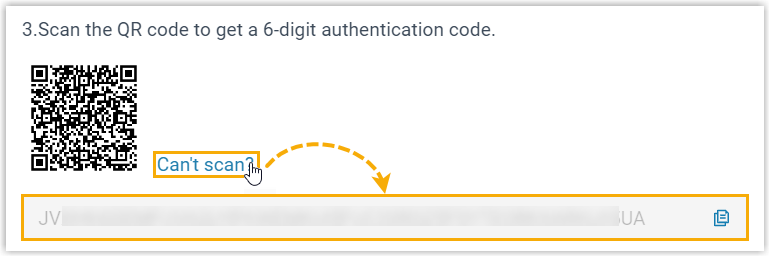
- On your mobile phone, open the authenticator application, and select to manually add an account.
- Enter the relevant information, and paste the secret key.Note: If you need to complete more configurations for the secret key, you should set SHA1 as the algorithm for TOTP protocol, and set to generate 6-digit code with an interval of 30 seconds.
Your account is added to the application, a 6-digit authentication code is shown.
6. On PBX web portal, enter the 6-digit authentication code in the
Authentication Code field.
7 .Click Save.
Result
- The webpage prompts a message "Edited successfully.", which means that you have successfully set up two-factor authentication.
- Next time you log in to PBX web portal, you need to enter an authentication code additionally.
Related Articles
Yeastar - Enabling TLS PBX and Extension
Enabling TLS PBX and Extension To configure TLS on extensions we must set the PBX TLS enablement in conjunction with the extension. This will Register extensions using transport TLS on P-Series Enable TLS PBX Settings 1. Within Yeastar Management ...How to Register a Yealink Handset on Yeastar Cloud PBX Using Yealink RPS
How to Register a Yealink Handset on Yeastar Cloud PBX Using Yealink RPS Access the Yeastar cloud PBX Select Extension and Trunk – Extension – Add Configure the required information for the User Select Save Select Auto Provisioning – Phones – Add ...Yeastar - PBX to Yeastar NeoGate TA800 Gateway (Peer Trunk Mode)
Yeastar P-Series to TA800 Complete Peer Trunk Integration Guide Document Purpose This document details a complete integration blueprint to deploy a Yeastar TA800 8-Port FXS gateway alongside a Yeastar P-Series PBX without using extension licenses. It ...Yeastar Disaster Recovery Setup
Yeastar Disaster Recovery Setup When the system is ordered (disaster recovery will be added as an additional license Once ordered you will be provided with two Activation Codes (example below) Deploy the Primary Server then deploy the Redundancy ...Yeastar - Backup P-Series Cloud PBX
Backup P-Series Cloud PBX Capture Backup Log in to Yeastar Central Management, Login as Administrator to the PBX instance -Take a backup of Instance. You must do this within the instance and not YCM portal (YCM does not give a download file option) ...