Yeastar - Linkus Two-factor Authentication (2FA) Overview
Two-factor Authentication (2FA) Overview
Linkus Web Client allows you to configure two-factor authentication (2FA) for your account. With 2FA enabled, both your account password and an additional authentication code are required for Linkus login, which adds an extra layer of security to your account. This topic provides an overview of the supported two-factor authentication methods.
- Authenticator Application
- Email Authentication
Two-factor authentication by authenticator application
After installing an authenticator application, you need to add your account to the application, via which you can obtain authentication codes for two-factor authentication. When you log in to your account, both account password and the authentication code generated by the authenticator application are required.
- At the top-right corner of Linkus Web Client, click your account, then go to Change Password & Security > Security Settings.
- Select the checkbox of Two-Factor Authentication.
- In the pop-up Password window, enter your account password and click Confirm to verify your operation.
- Select Authenticated by Authenticator.
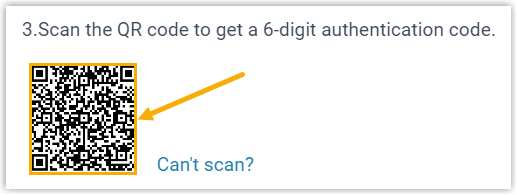
- Add your account to the authenticator application via either of the following methods
| Method | Instruction |
|---|---|
| Scan QR Code to quickly add the account | You can quickly add your account to the authenticator application by scanning the QR code provided by Linkus Web Client.
|
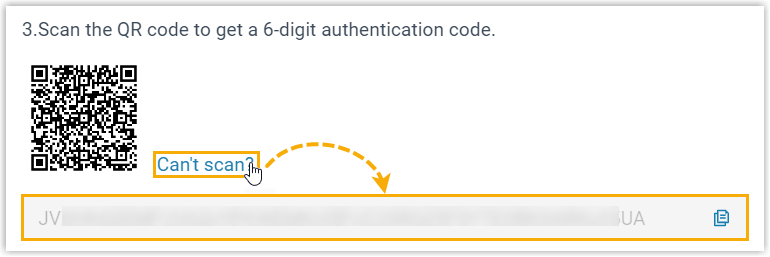
| Manually add the account | In case you can not scan QR code, you can manually add your account and enter the secret key provided by Linkus Web Client.
|
- On Linkus Web Client, enter the 6-digit authentication code in the Authentication Code field.
- Click Save.
Two-factor authentication by Email
This method allows you to receive authentication codes for two-factor authentication via the the email address you use to log in. When you log in to your account, both account password and the authentication code sent to your email are required.
- At the top-right corner of Linkus Web Client, click your account, then go to Change Password & Security > Security Settings.
- Select the checkbox of Two-Factor Authentication.
- In the pop-up Password window, enter your account password and click Confirm to verify your operation.
- Select Authenticated by Email, and complete the following settings:
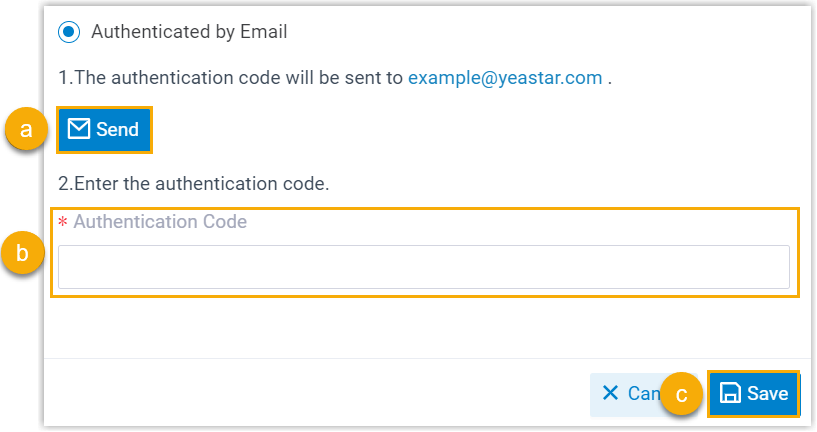
- Click Send.An email containing a 6-digit authentication code is sent to the email address that you use to log in.
- In the Authentication Code field, enter the authentication code.
- Click Save
Related Articles
Yeastar - Log in to Linkus Web Client
Log in to Linkus Web Client This topic describes how to log in to Linkus Web Client via a link in Linkus welcome email. Prerequisites Make sure you have received a welcome email. Note: The login can only be used once Procedure Access your mailbox and ...Yeastar Disaster Recovery Setup
Yeastar Disaster Recovery Setup When the system is ordered (disaster recovery will be added as an additional license Once ordered you will be provided with two Activation Codes (example below) Deploy the Primary Server then deploy the Redundancy ...Yeastar - 3CX Migration to Yeastar
3CX Migration to Yeastar The database of a 3CX can be extracted and loaded into Yeastar PBX. The process consists of 4 steps: Download Backup File from 3CX PBX Delete end devices for auto provisioning onto Yeastar and disable SIP trunks Upload the ...Yeastar - Security Rules and Settings
Security Rules and Settings Within Security option in Yeastar there are 2 Security configurable area's: Security Rules Security Settings Security Rules Allowed IPs Allowed IPs is used to add specific IP addresses or domain names to the PBX allowlist ...Yeastar - CRM Integration
Yeastar CRM integration Pre Configured Templates Yeastar CRM Integration is designed to facilitate quick integration between your PBX and CRM account. Complete the integration in minutes with a step-by-step configuration wizard and enjoy rich ...