Customize Your Own Brand of Cloud PBXs
With the White Label service, you are able to customize your own-brand Cloud PBXs on Yeastar Central Management in terms of brand name, product name, product logo, favicon and Cloud PBX email signature. The White Label service provides an increasingly cost-effective way to accelerate and scale your business.
Prerequisites
You have subscribed to the White Label service.

Procedure
- Log in to Yeastar Central Management, go to Cloud PBX > White Label.
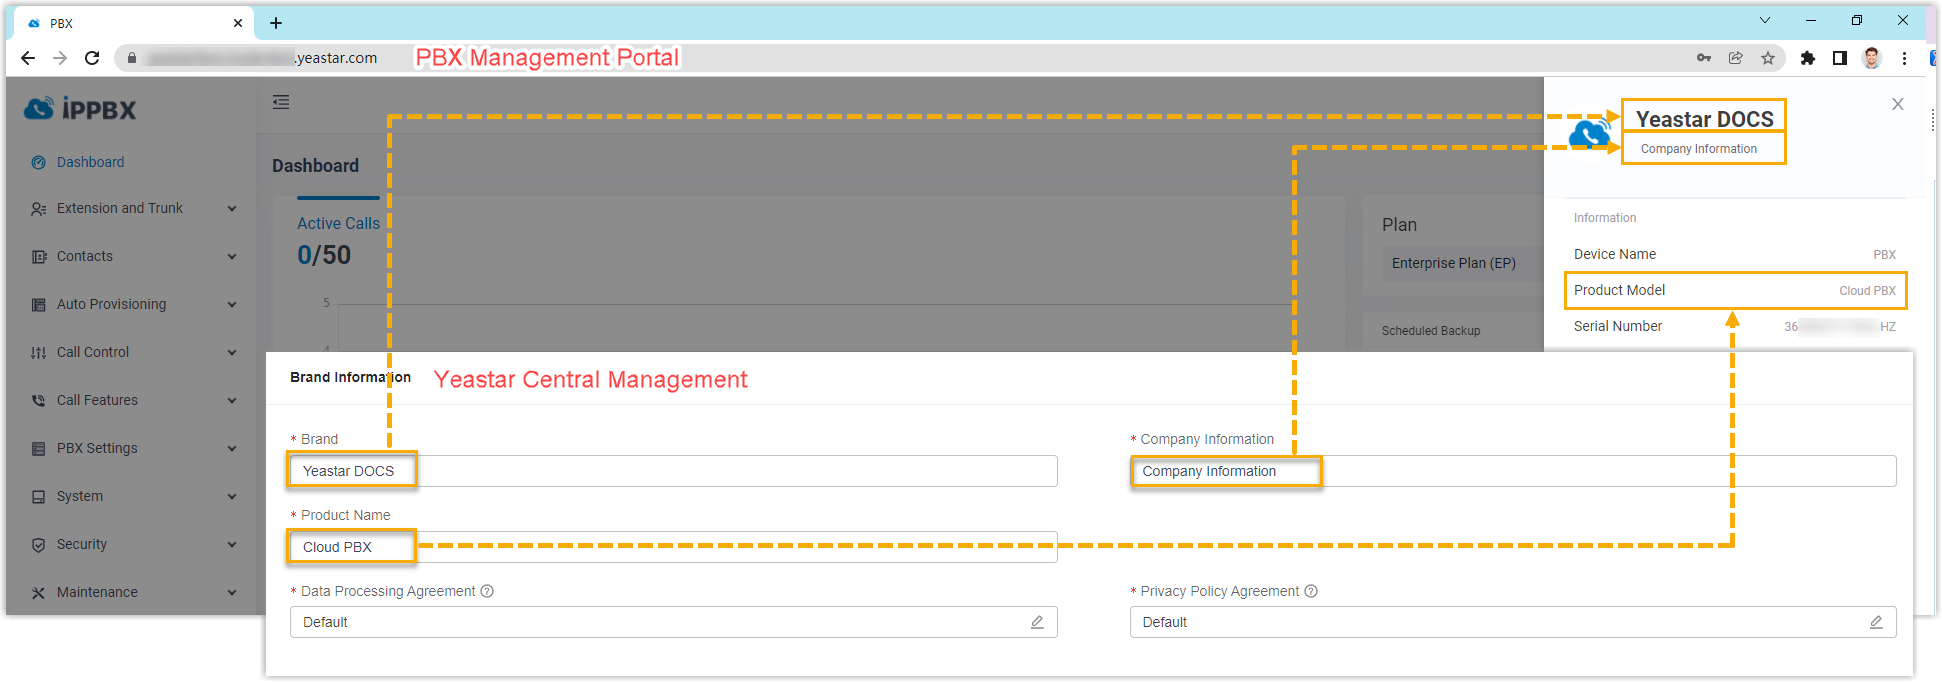
- In the Brand Information section, specify the information of your brand for the Cloud PBXs.Note: The contents specified in this section will be displayed in the PBX management portal and Linkus Clients.
Setting Description Brand Enter your brand name. Company Information Enter your company information. Product Name Specify a product name for your Cloud PBXs. Data Processing Agreement Click to customize an agreement
for the Cloud PBX or use the default template directly.Note: This agreement is only visible in the PBX management portal for the Cloud PBX super administrator.
to customize an agreement
for the Cloud PBX or use the default template directly.Note: This agreement is only visible in the PBX management portal for the Cloud PBX super administrator.Privacy Policy Agreement Click to customize an agreement
for the Cloud PBX or use the default template directly.Note: This agreement is visible in the Linkus Clients for Cloud PBX extension users. - In the Other Information section, customize the appearance for your Cloud PBXs .Tip: You can check the preview display on the right of the setting page.
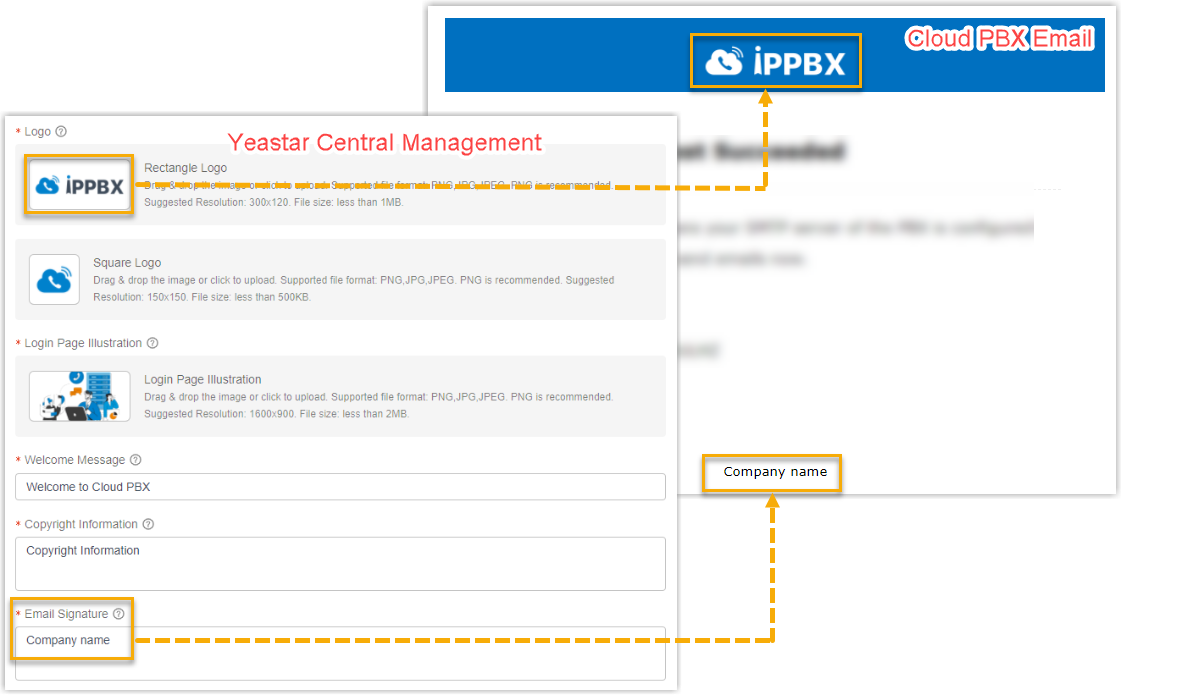
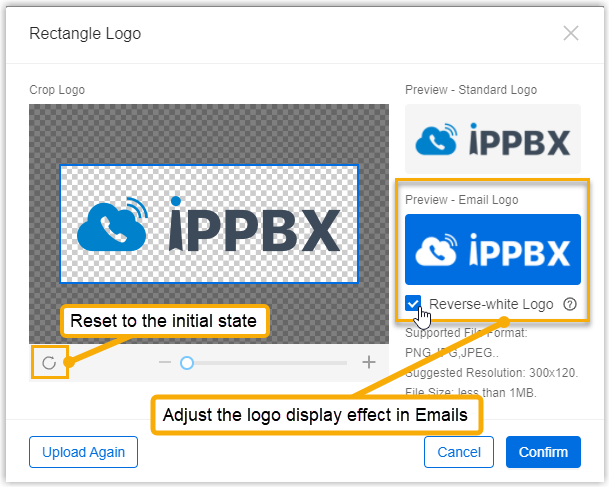
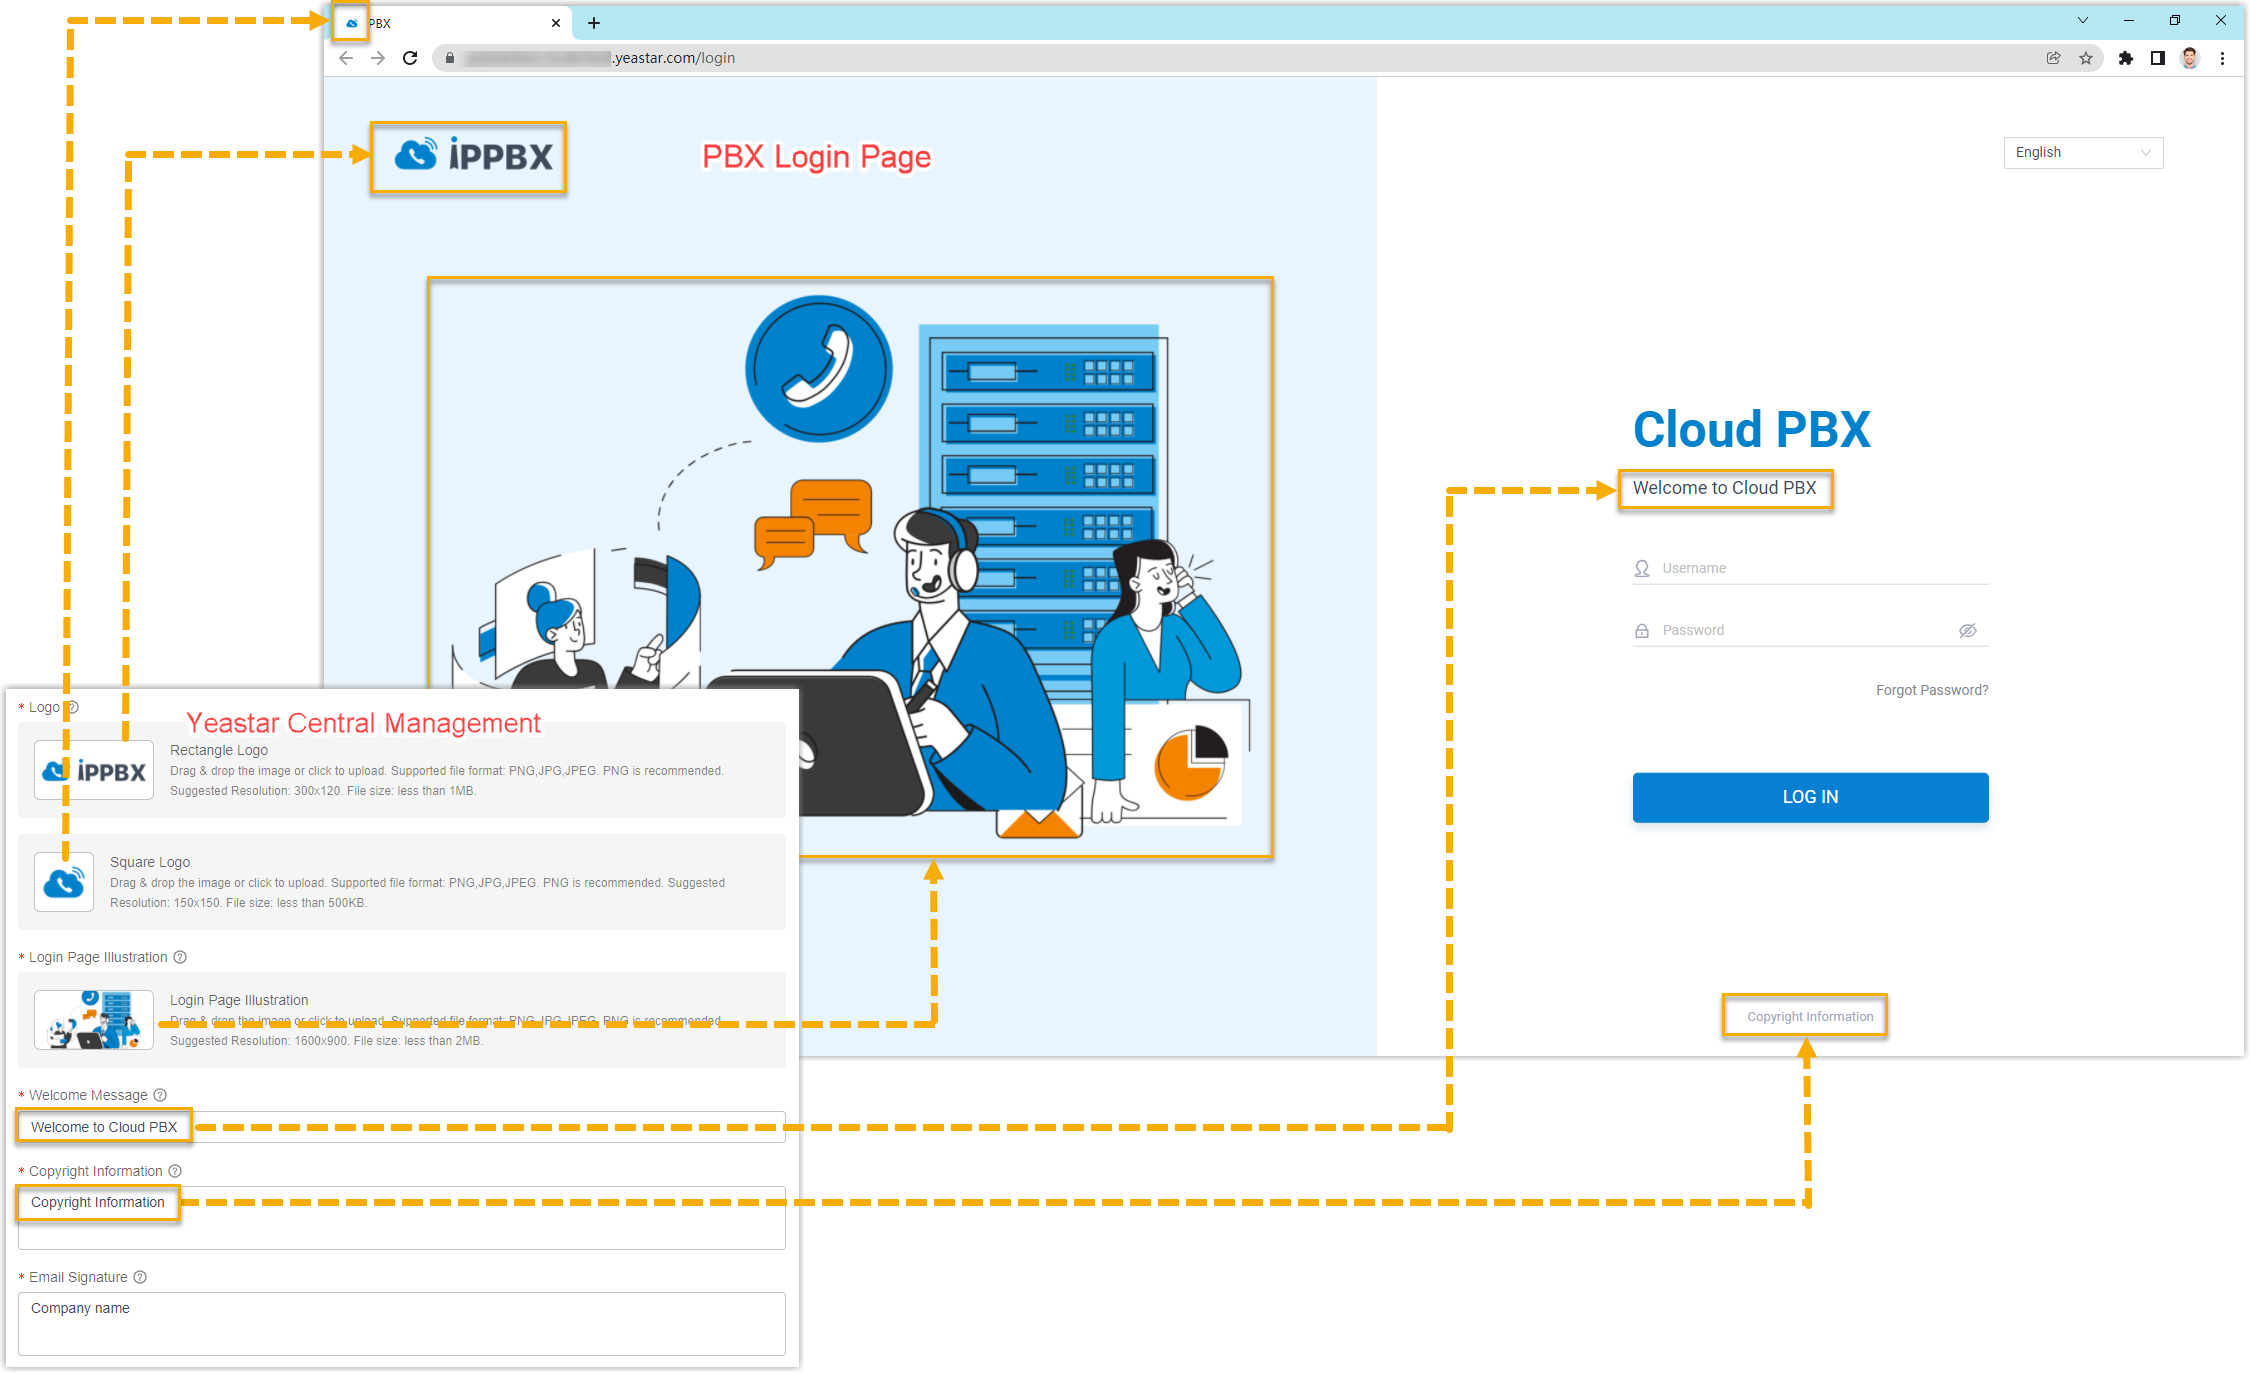
Setting Description Rectangle Logo Upload a rectangular logo, adjust the image as needed, and click Confirm.The rectangle logo will be displayed in the PBX login page, notification emails and wherever the logo is required.
Note: The logo file should meet with the following requirements:- File format: PNG, JPG, or JPEG
- File name: Less than 127 characters (including file extension)
- File size: Less than 1 MB
- Suggested resolution: 300×120
Square Logo Upload a square logo, adjust the image as needed, and click Confirm.The square logo will be used as favicon that is displayed in the browser tab.Note: The logo file should meet with the following requirements:- File format: PNG, JPG, or JPEG
- File name: Less than 127 characters (including file extension)
- File size: Less than 500 KB
- Suggested resolution: 150×150
Login Page Illustration Upload an image, adjust the image as needed, and click Confirm.The image will be displayed on the left half of the Cloud PBX Login Page.Note: The image file should meet with the following requirements:- File format: PNG, JPG, or JPEG
- File name: Less than 127 characters (including file extension)
- File size: Less than 2 MB
- Suggested resolution: 1600×900
Welcome Message Specify a welcome message.The Welcome Message will be displayed under the product name in the Cloud PBX Login page.
Copyright Information Enter the copyright information of the product.The Copyright Information will be displayed on the bottom of the Cloud PBX Login page.
Email Signature Specify an email signature.Note: You can create a customized HTML email signature using the HTML tags -<br/>,<strong/>,<b/>and<a/>to format the layout accordingly.The Email Signature will be displayed on the bottom of the Cloud PBX emails, including the PBX activation email and the emails sent by Cloud PBX.
- In the Configuration Effective Time section, decide when will the configurations take effect.Note: Only the Cloud PBXs that meet with the following requirements will apply the configuration.
- The Cloud PBX is created after you subscribe the White Label service.
- The firmware version of Cloud PBX is 84.6.0.47 or later.
Setting Description Update Immediately If selected, all the Cloud PBXs that are created after you subscribed the White Label service will be rebooted to apply the change after you save the configurations. Update Later If selected, the Cloud PBXs will apply the change after you reboot the Cloud PBX manually. - Click Save.
Configuration Examples
The following figures show the configurations and appearance of a customized brand Cloud PBX.
- Cloud PBX Login Page
- Cloud PBX management portal
- Cloud PBX Email