Yeastar - Call Flow Designer - Supported Components
Initial Action
This topic provides an overview of the Initial Action component, and describes its restriction, configuration, as well as supported connections.
Component restriction
Each call flow contains exactly one Initial Action component. This component is automatically added upon call flow creation and can not be deleted.
Component introduction
Initial Action component is the entry point of a call flow. It allows you to specify the phone number(s) that callers can dial to initiate the flow, and optionally configure an audio prompt to welcome callers or provide instructions for them.

- Supported number types
- You can assign extension number or trunk DID number(s) to the component.
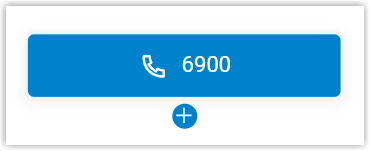
Number Type Description Extension Number The system reserves a range of extension numbers for call flow - 6900 - 6999 (max. extensions ≤ 6000) or 50900 - 50999 (max. extensions > 6000). By default, the first available extension number within the range is assigned upon call flow creation, you can also assign a custom number outside the reserved range.
Note:To change the default extension range for call flow, go to PBX Settings > Preferences > Extension Preferences > Call Flow.
Trunk DID Number(s) You can assign trunk DID number(s) to the component when creating a call flow.
Note:- To customize DID numbers for SIP trunks, go to Extension and Trunk > Trunk > DIDs/DDIs.

- If a DID number is assigned to both call flow and inbound route, the call flow takes precedence.
Inbound calls to the DID number will be routed to call flow when it is ENABLED; otherwise, calls will be routed to the destination defined in inbound route.
- To customize DID numbers for SIP trunks, go to Extension and Trunk > Trunk > DIDs/DDIs.
- Supported prompt types
- You can add audio prompt(s) or a text-to-speech message to interact with callers.
Prompt Type Description Custom Prompt Choose from existing custom prompts, or create a new one by recording with an extension or uploading an audio file. Music on Hold (MoH) Choose from existing MoH. Note:Before you begin, make sure the desired MoH is configured in PBX Settings > Voice Prompt > Music on Hold.
Text to Speech (TTS) Enter the desired text, which will be converted to speech in the selected language and voice style.
Note:Before you begin, make sure the Text-to-Speech feature is enabled in Integrations > AI.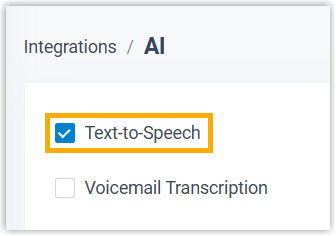
Component configuration
- After creating a call flow, click Initial Action component to proceed with the configuration.
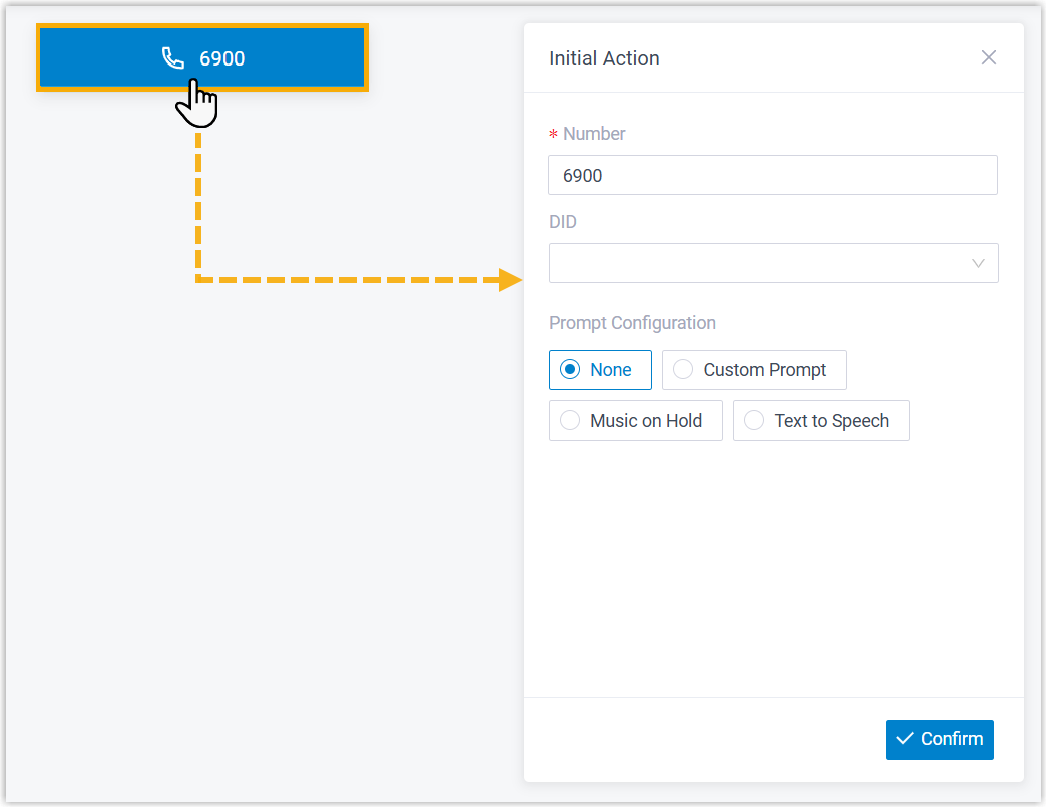
- Specify the number(s) that callers can dial to initiate the call flow.
Item Description Number Retain the default extension number, or customize a number. Note:- The custom number can fall outside of the default range (6900 - 6999 / 50900 - 50999).
- Once saved, the number can not be modified.
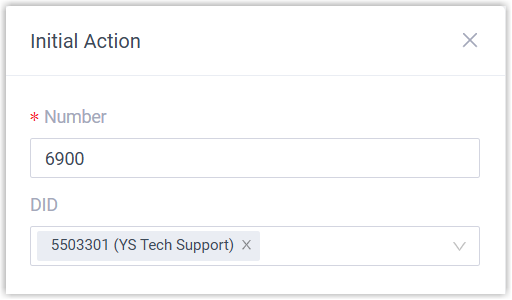
DID Optional. Select one or more trunk DID number(s) from the drop-down list. Note:- Up to 500 DID numbers are supported. Note that the more DID numbers assigned, the longer it takes to match inbound call with the call flow.
- Inbound calls from DID numbers can be routed to the call flow only in the following cases:
If the received DID number is 7 digits or fewer, it exactly matches a configured DID number.
If the received DID number is longer than 7 digits, its last 7 digits exactly match a configured DID number.
- Optional: Configure audio prompt(s) or a text-to-speech message to welcome callers or provide instructions for them.
Item Description Custom Prompt 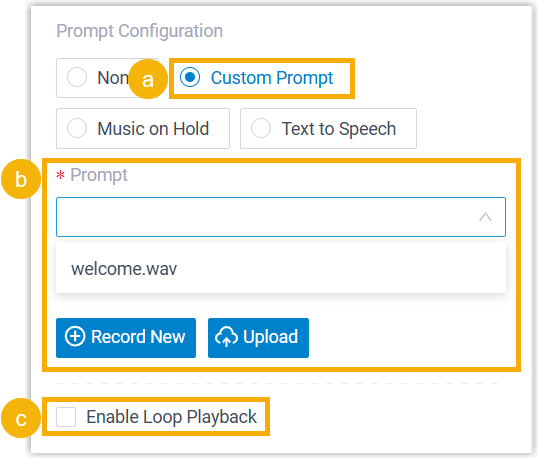
- Click Custom Prompt.
- Specify custom prompt(s).Note:Up to 5 custom prompts are supported.
- To choose from an existing prompt, select it from the drop-down list of Prompt.
- To use a new prompt, click Record New to record prompt with an extension, or click Upload to upload an audio file.Note:The new prompt will be saved in PBX Settings > Voice Prompt > Custom Prompt.
- Optional: To play the custom prompt(s) in a loop, select the checkbox of Enable Loop Playback.Note:The looped prompt will be overridden if the next connected component is configured with a prompt.
Music on Hold (MoH) 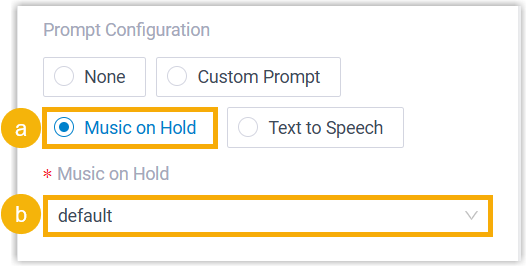
- Select Music on Hold.
- Select an existing MoH from the drop-down list of Music on Hold.
Note:The MoH will be overridden if the next connected component is configured with a prompt.Text to Speech (TTS) 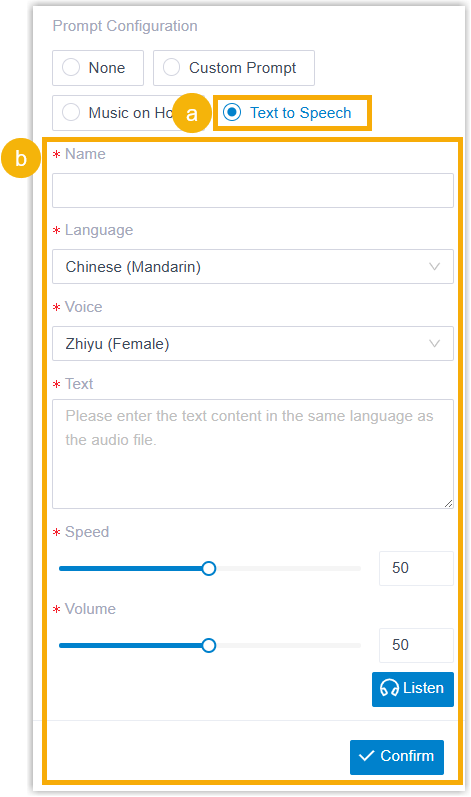
- Select Text to Speech.
- Complete the rest of the configurations.
The system will convert the text into speech based on the settings.
Note:The new speech will be saved to the system and synchronized to PBX Settings > Voice Prompt > Custom Prompt.
- At the bottom-right corner, click Confirm.
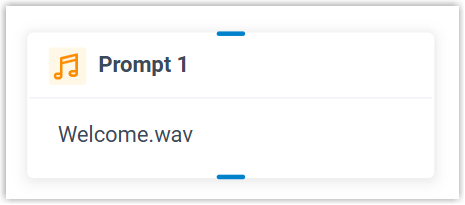
The selected number will appear on the component.
Prompt
This topic provides an overview of the Prompt component, and describes its configuration as well as supported connections.
Component introduction
Prompt component allows you to play audio prompt(s) or a text-to-speech message, which can be used to welcome callers or provide them with instructions.
- Supported prompt types
Prompt Type Description Custom Prompt Choose from existing custom prompts, or create a new one by recording with an extension or uploading an audio file. Music on Hold (MoH) Choose from existing MoH. Note:Before you begin, make sure the desired MoH is configured in PBX Settings > Voice Prompt > Music on Hold.Text to Speech (TTS) Enter the desired text, which will be converted to speech in the selected language and voice style.
Note:Before you begin, make sure the Text-to-Speech feature is enabled in Integrations > AI.
Component configuration
- After adding Prompt component to a call flow, click Prompt component to proceed with the configuration.
- Configure audio prompt(s) or a text-to-speech message.
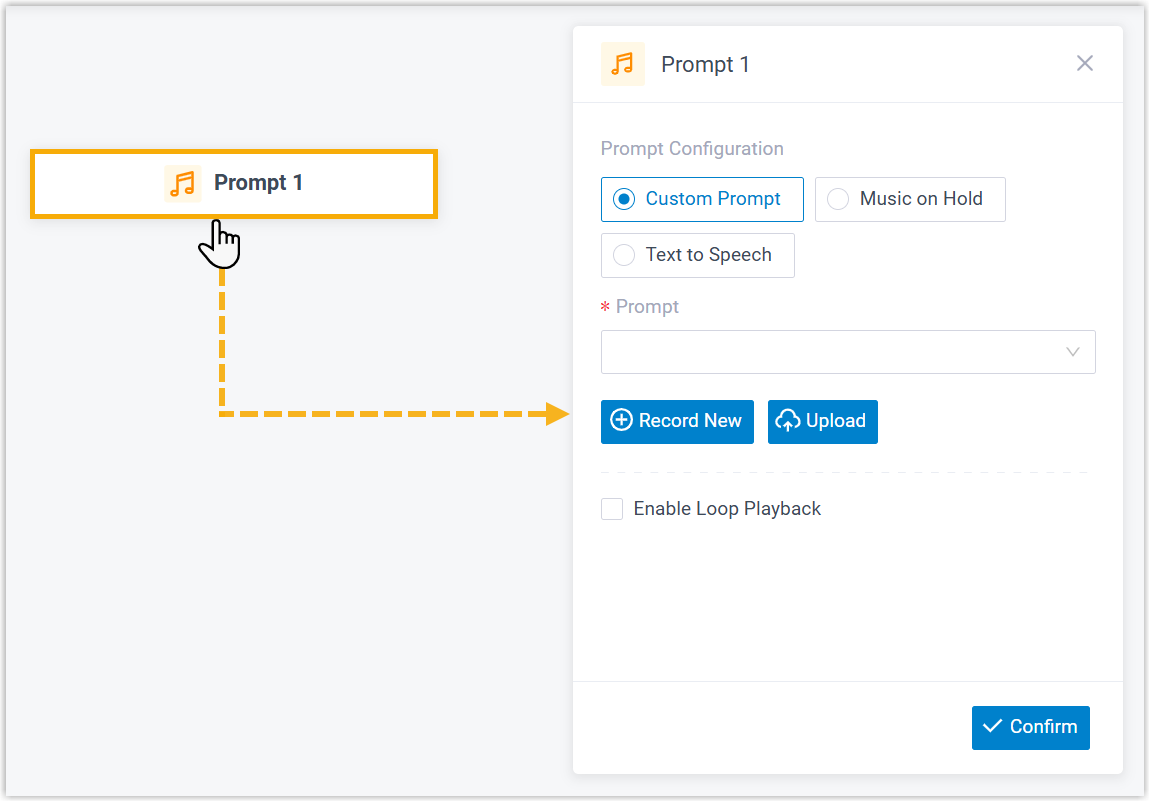
Item Description Custom Prompt 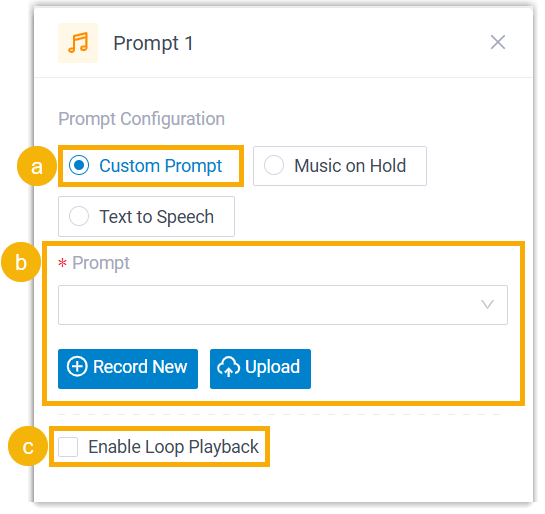
- Click Custom Prompt.
- Specify custom prompt(s).Note:Up to 5 custom prompts are supported.
- To choose from an existing prompt, select it from the drop-down list of Prompt.
- To use a new prompt, click Record New to record prompt with an extension, or click Upload to upload an audio file.Note:The new prompt will be saved in PBX Settings > Voice Prompt > Custom Prompt.
- Optional: To play the custom prompt(s) in a loop, select the checkbox of Enable Loop Playback.Note:The looped prompt will be overridden if the next connected component is configured with a prompt.
Music on Hold 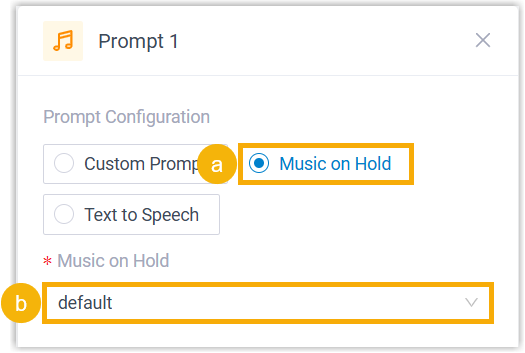
- Select Music on Hold.
- Select an existing MoH from the drop-down list of Music on Hold.
Note:The MoH will be overridden if the next connected component is configured with a prompt.Text to Speech (TTS) 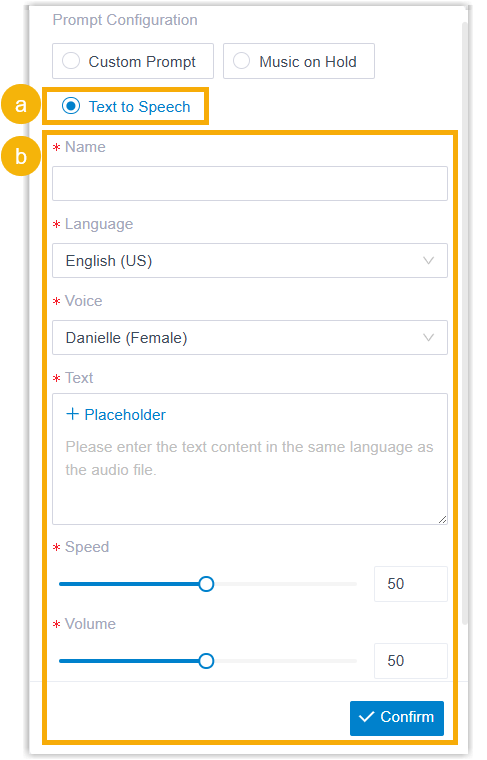
- Select Text to Speech.
- Complete the rest of the configurations.
The system will convert the text into speech based on the settings.
Note:The new speech will be saved to the system and synchronized to PBX Settings > Voice Prompt > Custom Prompt.
- At the bottom-right corner, click Confirm.
The selected prompt will appear on the component.
Business Hours
This topic provides an overview of the Business Hours component, and describes its configuration as well as supported connections.
Component introduction
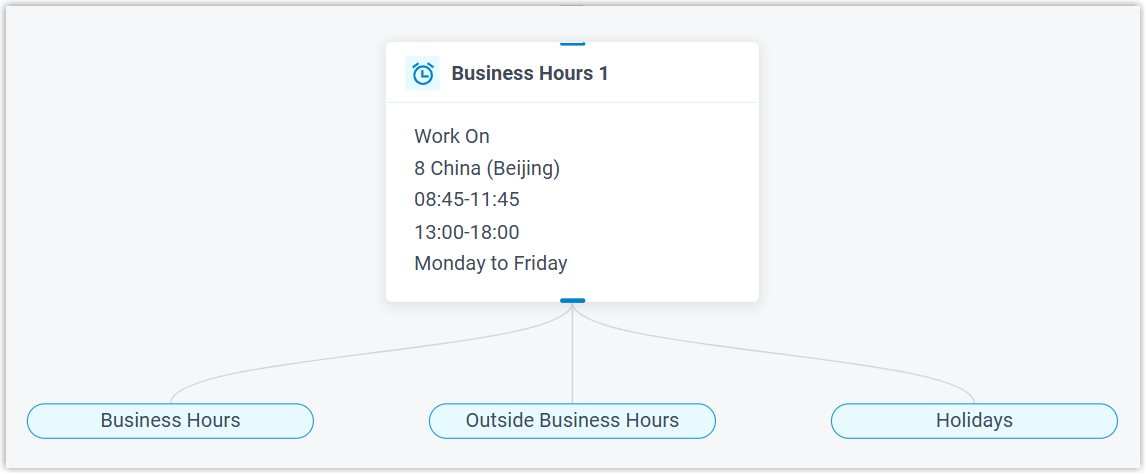
Business Hours component allows you to route calls to different destinations based on the time of day. A variety of time-based modes are available to flexibly define office hours and implement time-based call routing.
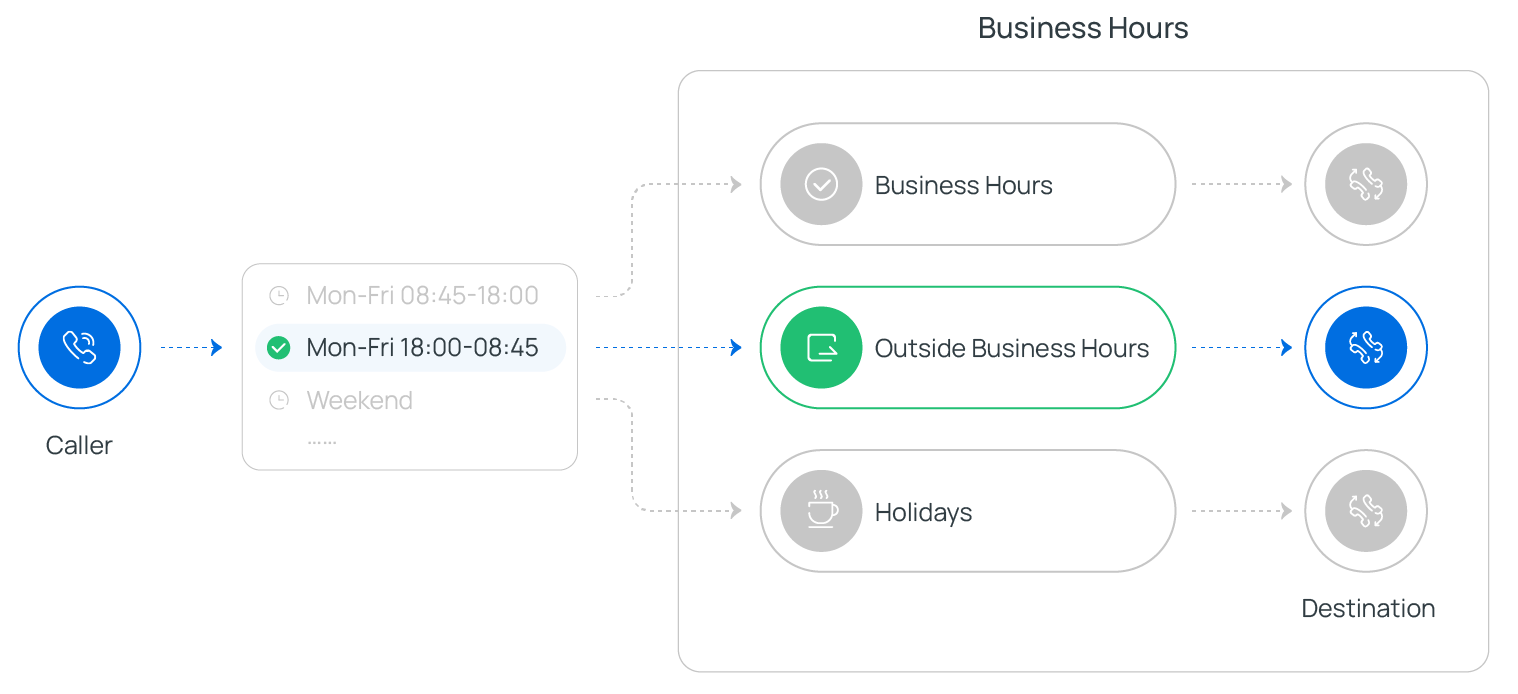
- Supported time-based modes
Type Description Business Hours Configured for Time Zone Use pre-configured business hours for specific time zone.
Note:This requires you to configure business hours in advance. To configure this, go to Call Control > Business Hours and Holidays.Custom Business Hours Create custom business hours with a uniform or varied schedule through the week, or full time (24x7) schedule.
Custom Time Periods Create custom time periods to accommodate granular scheduling needs.
Component configuration
- After adding Business Hours component to a call flow, click Business Hours component to proceed with the configuration.
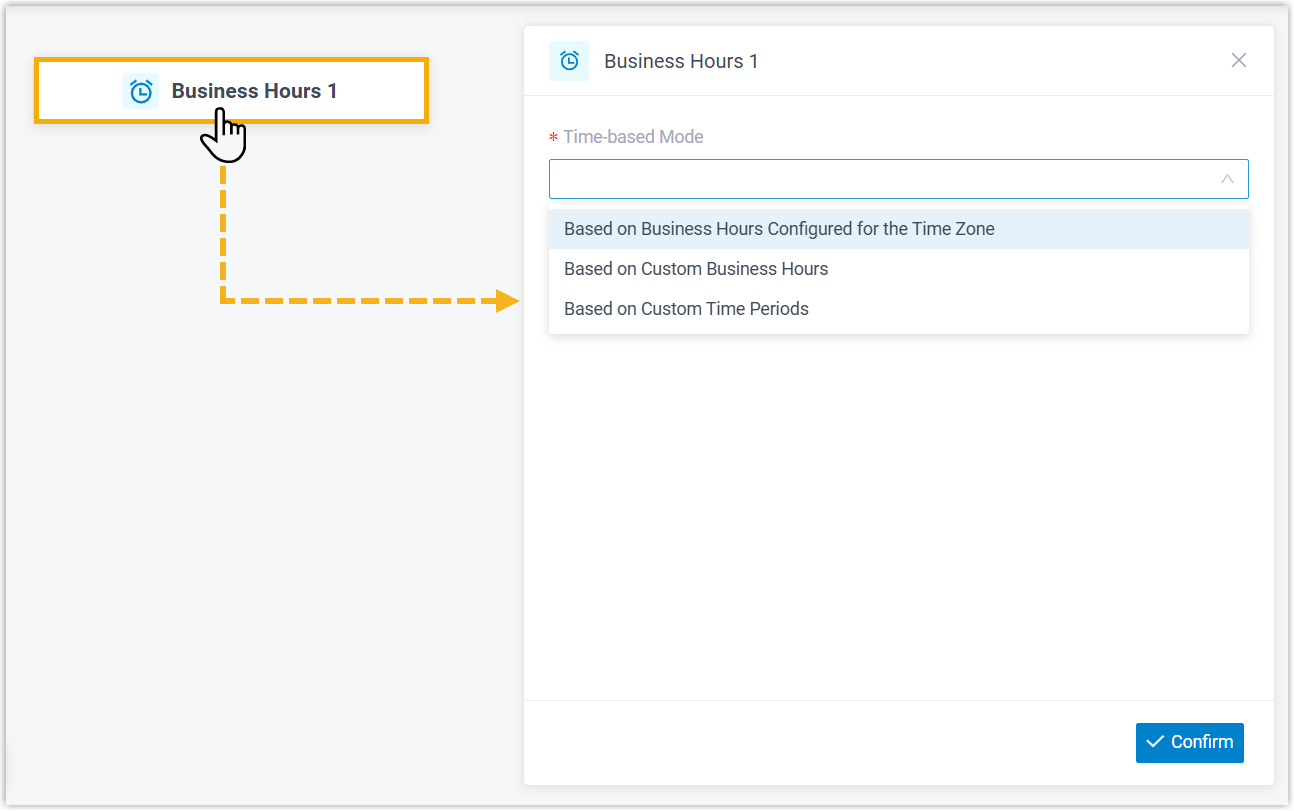
- Select a time-based mode according to your business schedule, then configure its related settings.
Scenario Description Use Business Hours Configured for Time Zone 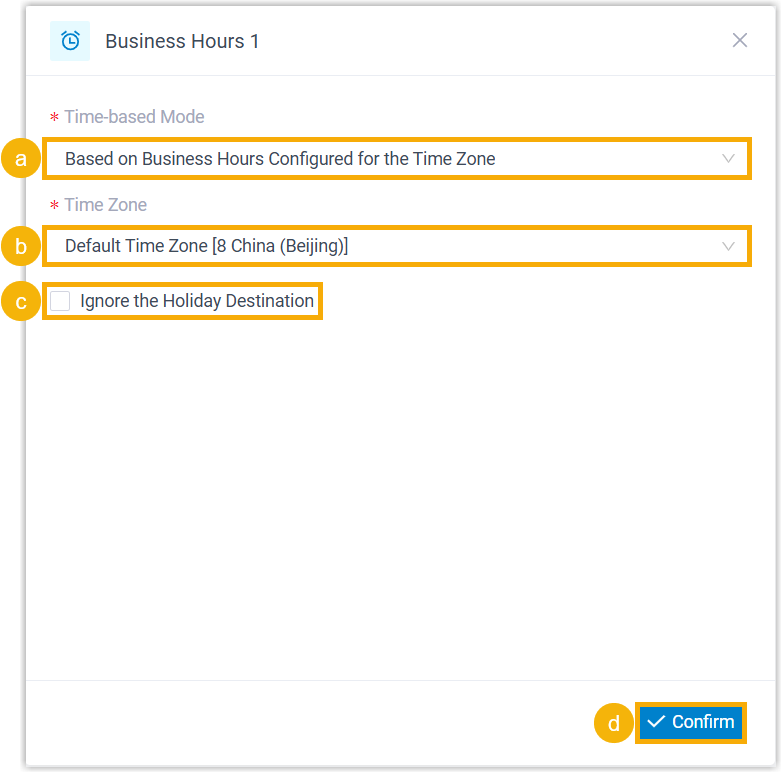
- In the Time-based Mode drop-down list, select Based on Business Hours Configured for the Time Zone.
- In the Time Zone drop-down list, select a time zone.
- Optional: To prevent incoming calls from being distributed to the holiday destination, select the checkbox of Ignore the Holiday Destination.Note:If enabled, incoming calls during holidays will be routed to the destination defined for Business Hours or Outside Business Hours.
- At the bottom-right corner, click Confirm.
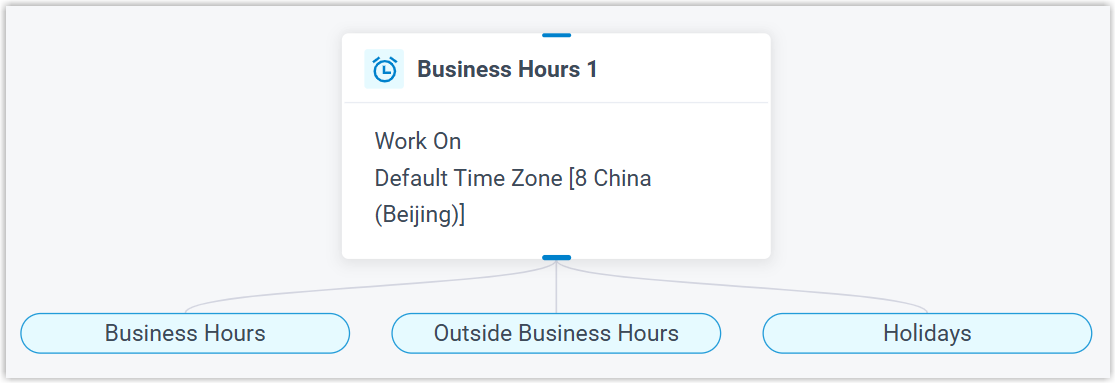
The selected time zone and multiple time branches will appear on the component.
Use Custom Business Hours 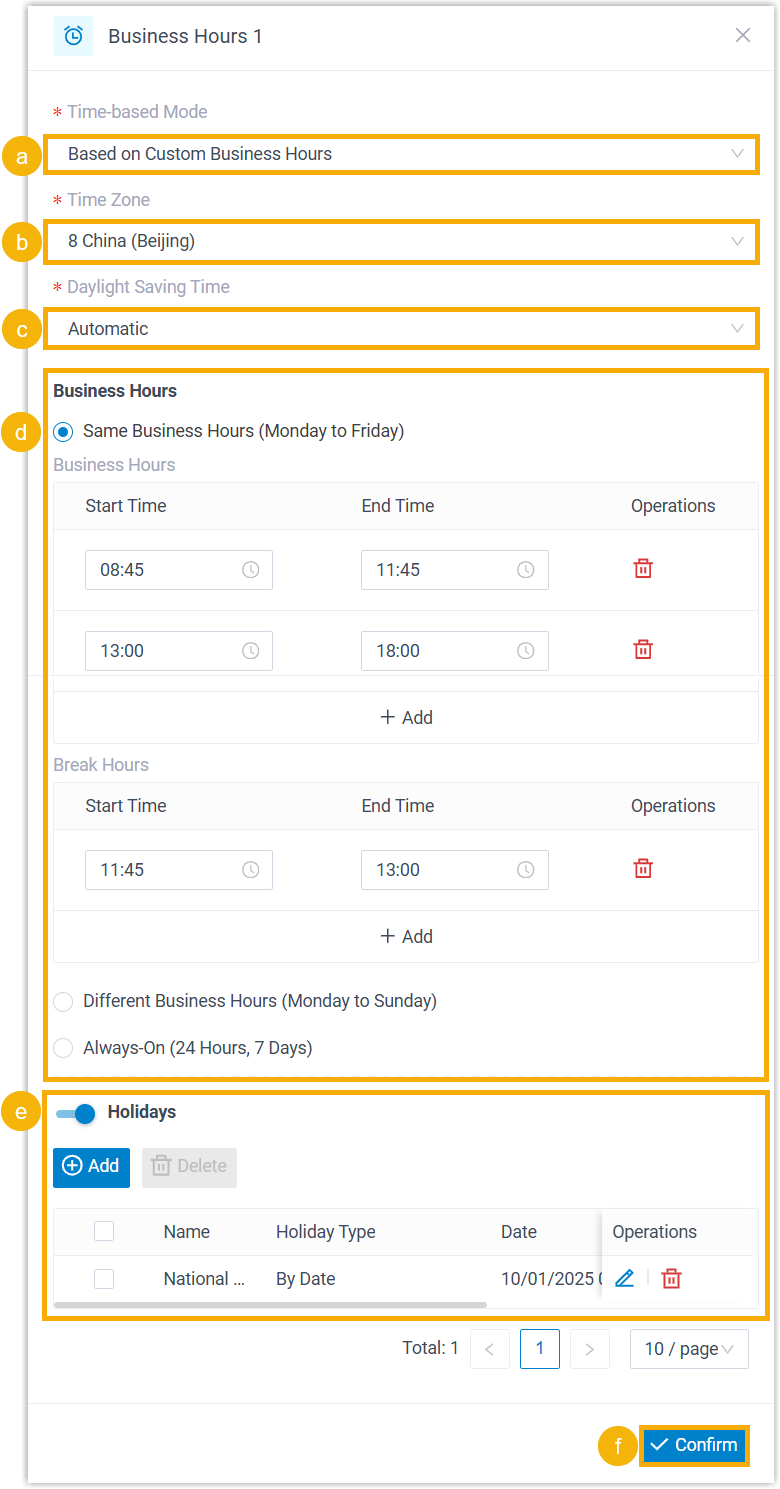
- In the Time-based Mode drop-down list, select Based on Custom Business Hours.
- In the Time Zone drop-down list, select a time zone.
- In the Daylight Saving Time drop-down list, select an option to enable or disable the feature.
- Select a business hour type, then configure its related settings to customize business hours.Note:Up to 10 time periods are supported for business hours and break hours respectively.
- Optional: Turn on the switch of Holidays, then add holidays.Note:Up to 50 holidays are supported.
- At the bottom-right corner, click Confirm.
The custom business hours and multiple time branches will appear on the component.
Use Custom Time Periods 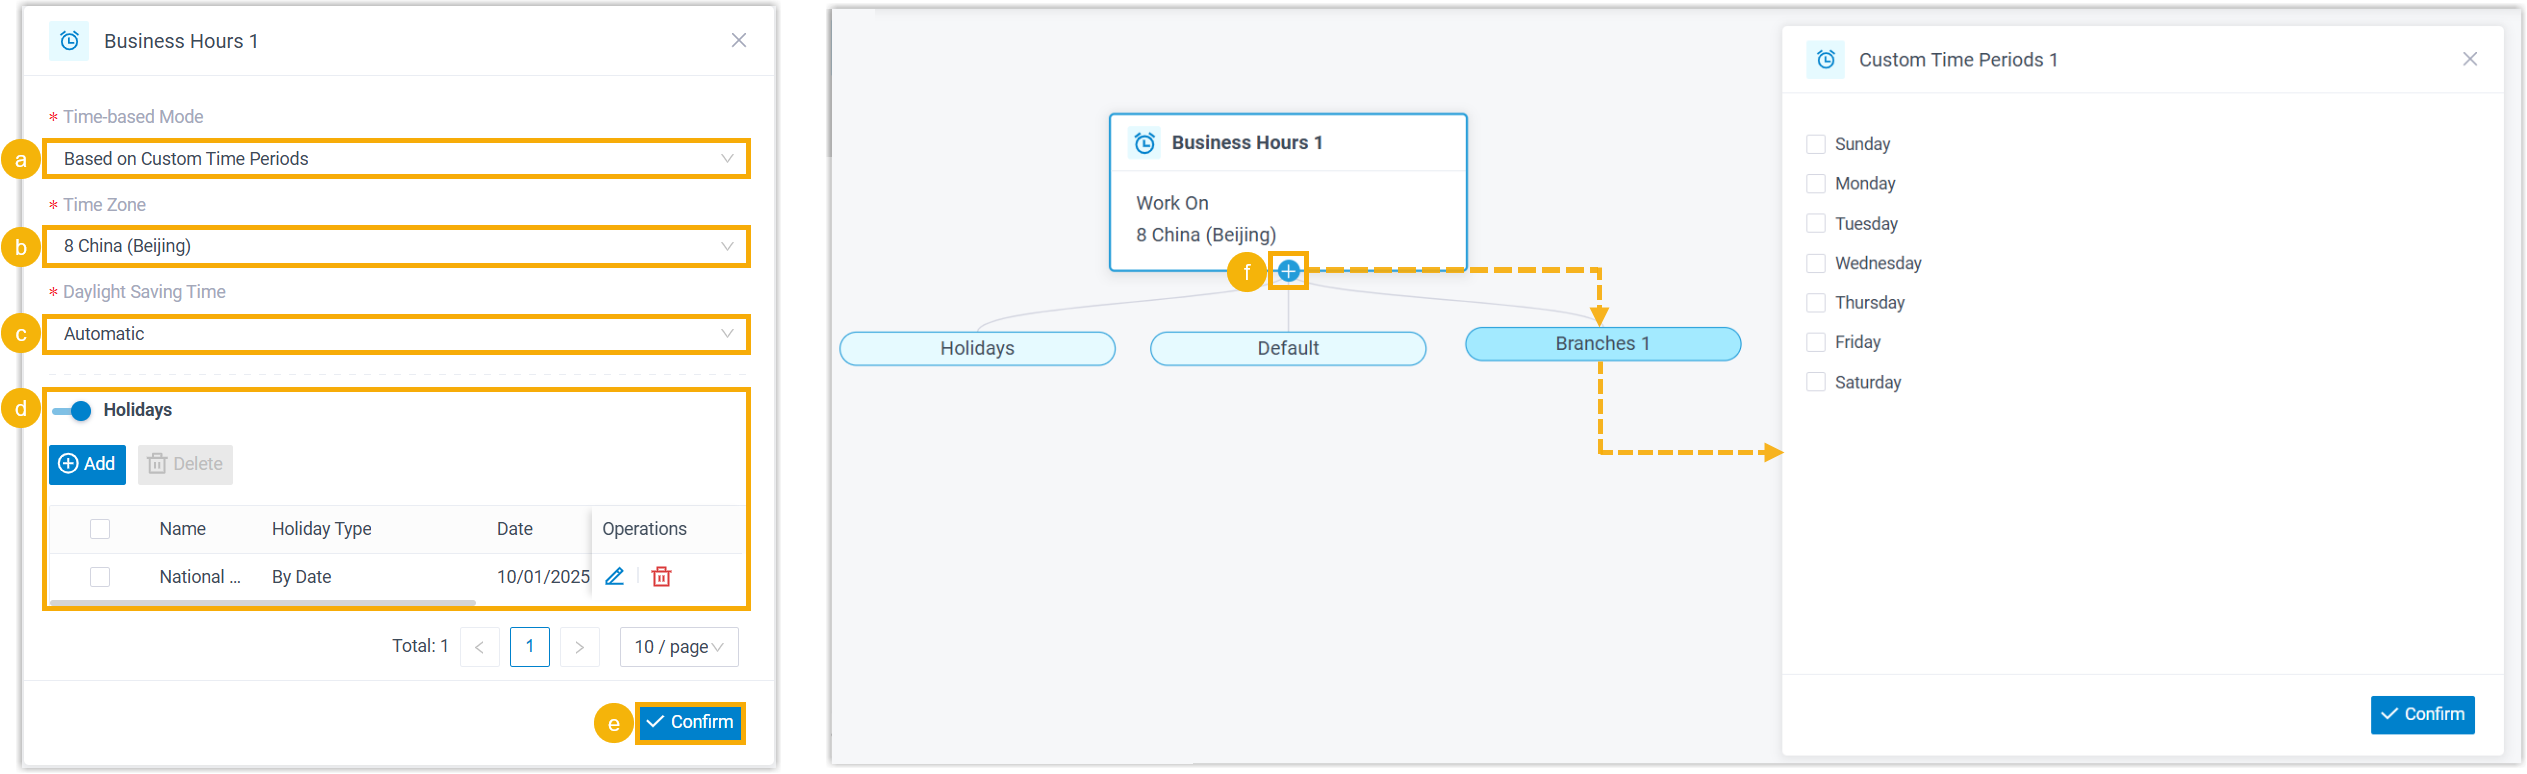
- In the Time-based Mode drop-down list, select Based on Custom Time Periods.
- In the Time Zone drop-down list, select a time zone.
- In the Daylight Saving Time drop-down list, select an option to enable or disable the feature.
- Optional: Turn on the switch of Holidays, then add holidays.Note:Up to 50 holidays are supported.
- At the bottom-right corner, click Confirm.
- Click
 on the component to add and configure custom time periods.Note:Up to 50 custom time periods are supported.
The time zone and multiple time branches will appear on the component.
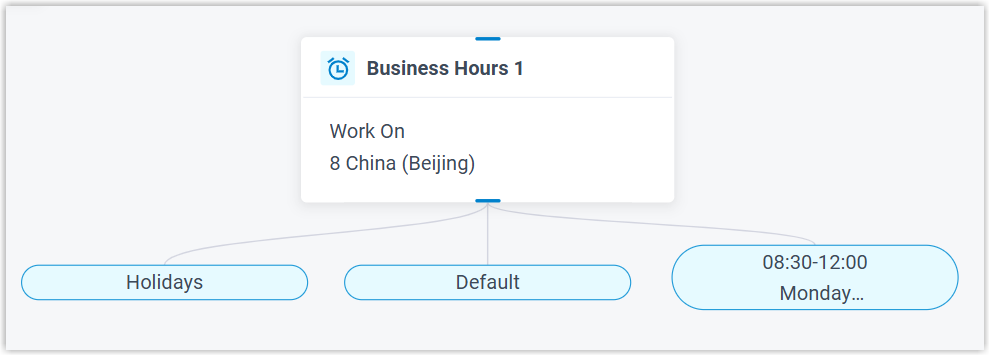 Note:Default branch indicates the failover destination for incoming calls that don't match any configured time conditions.
Click
on the branch to add the next component to route the call or trigger other actions.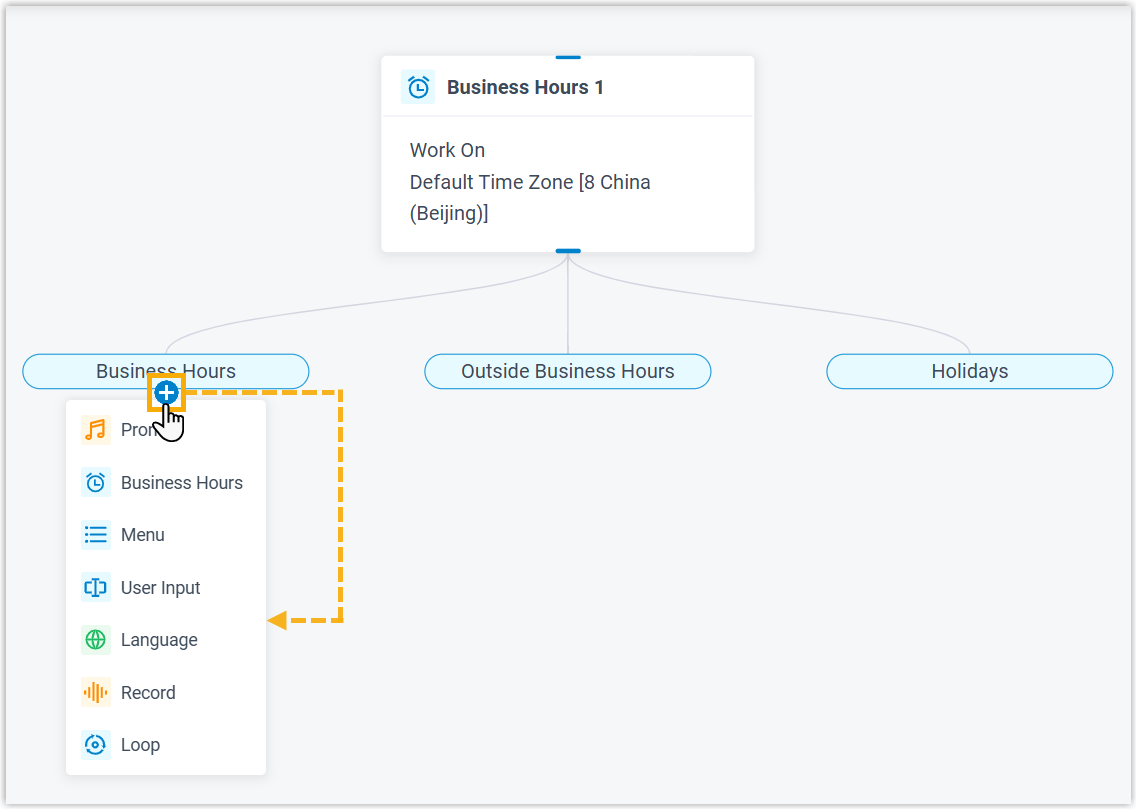
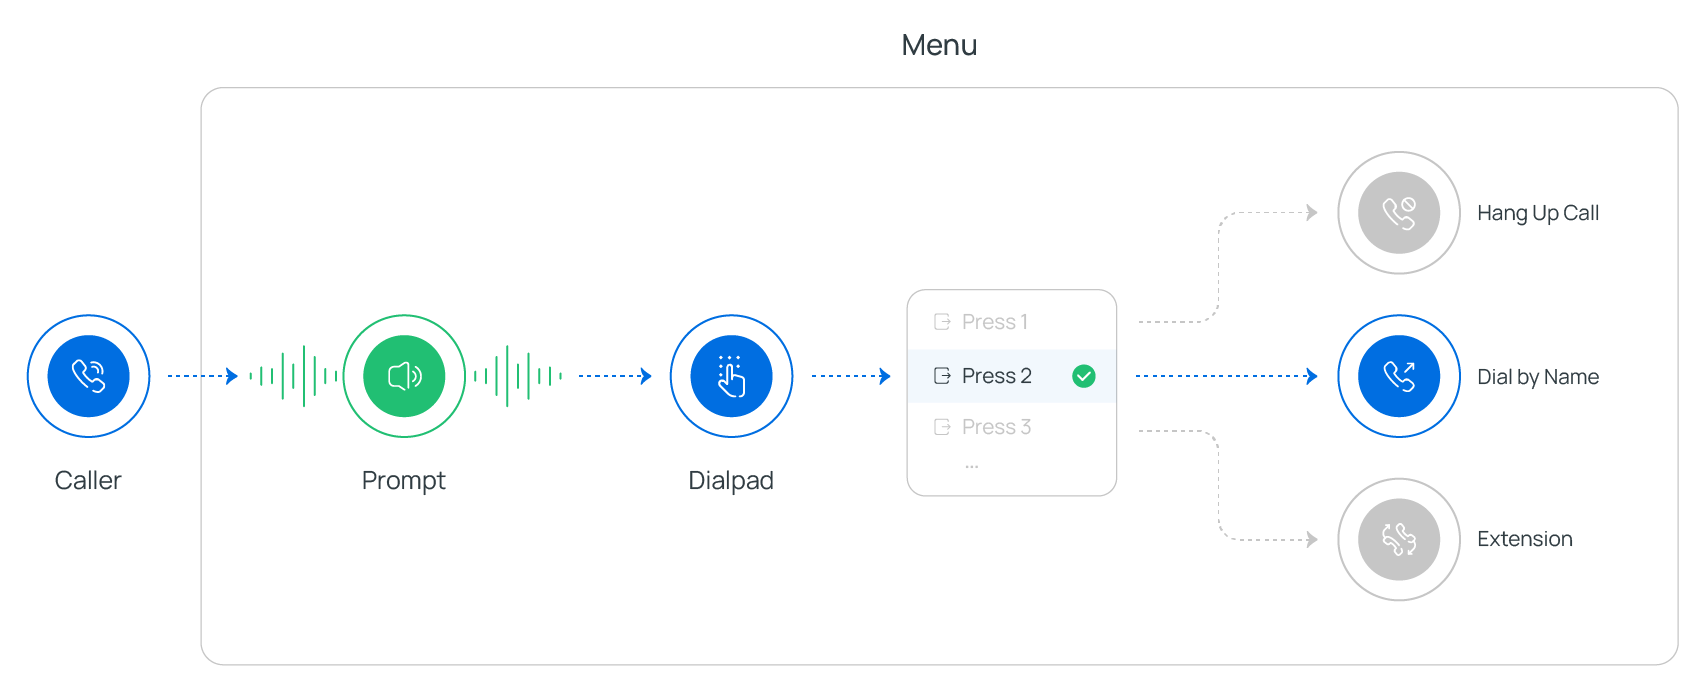
Menu
This topic provides an overview of the Menu component, and describes its configuration, variables, as well as supported connections.
Component introduction
Menu component allows you to present callers with a set of menu options, and route calls based on the DTMF digit that they press. The input value is stored in variables, which can be used as input for subsequent components or for condition evaluation.
You can configure when the system stops collecting DTMF digits - either when reaching digit or response timeout or when callers press an end key. Additionally, audio prompt(s) or a text-to-speech message can be set to prompt callers for input.
- Supported prompt types
Prompt Type Description Custom Prompt Choose from existing custom prompts, or create a new one by recording with an extension or uploading an audio file. Music on Hold (MoH) Choose from existing MoH. Note:Before you begin, make sure the desired MoH is configured in PBX Settings > Voice Prompt > Music on Hold.Text to Speech (TTS) Enter the desired text, which will be converted to speech in the selected language and voice style.
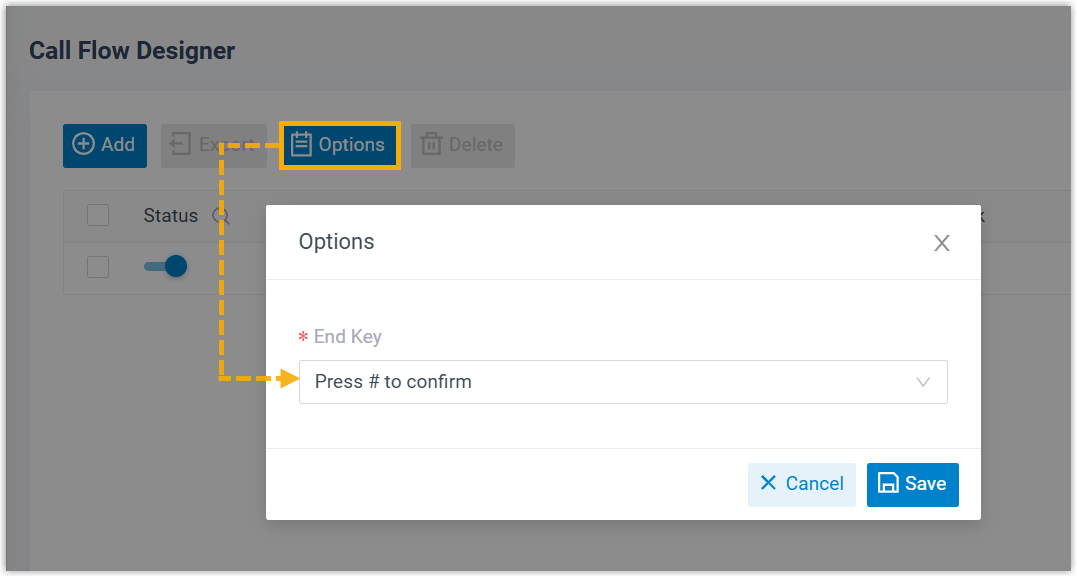
Note:Before you begin, make sure the Text-to-Speech feature is enabled in Integrations > AI.- Supported end keys
#key or*key.- You can set the end key in Call Flow Designer > Options.
Component configuration
- Set prompt and digit timeout
- Click Menu component to proceed with the configuration.
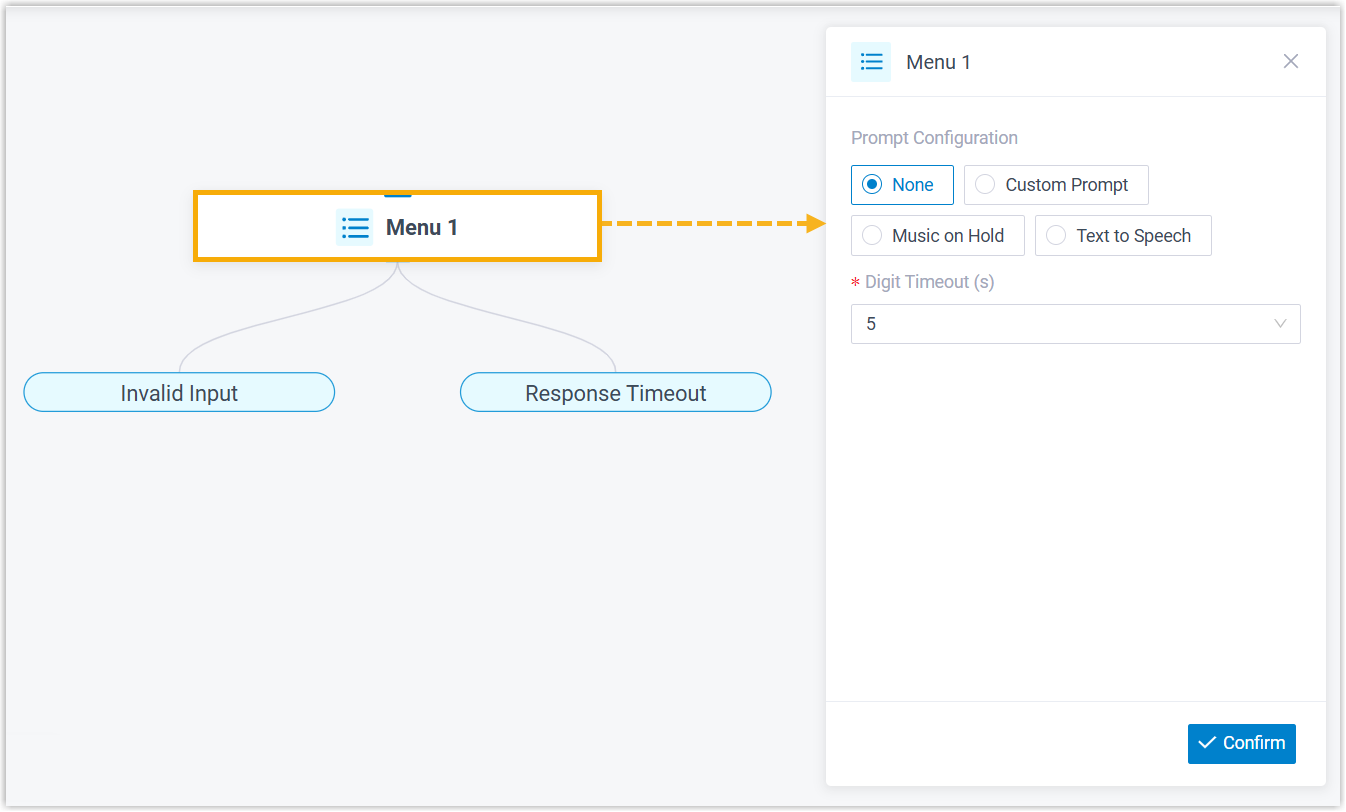
- Configure audio prompt(s) or a text-to-speech message to instruct callers.
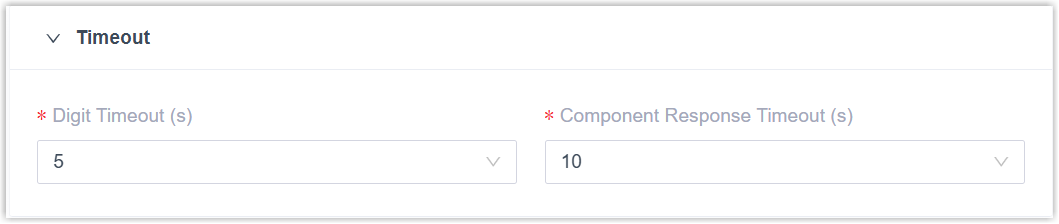
Item Description Custom Prompt Music on Hold (MoH) Text to Speech (TTS) - In the Digit Timeout(s) field, set how long to wait for the caller to enter the next digit.
You can select a value from the drop-down list, or enter a value between 1 and 9999.
- At the bottom-right corner, click Confirm.
- Set retry strategy for invalid input
- To allow callers to return to the component for a retry upon invalid key input, complete the following settings.
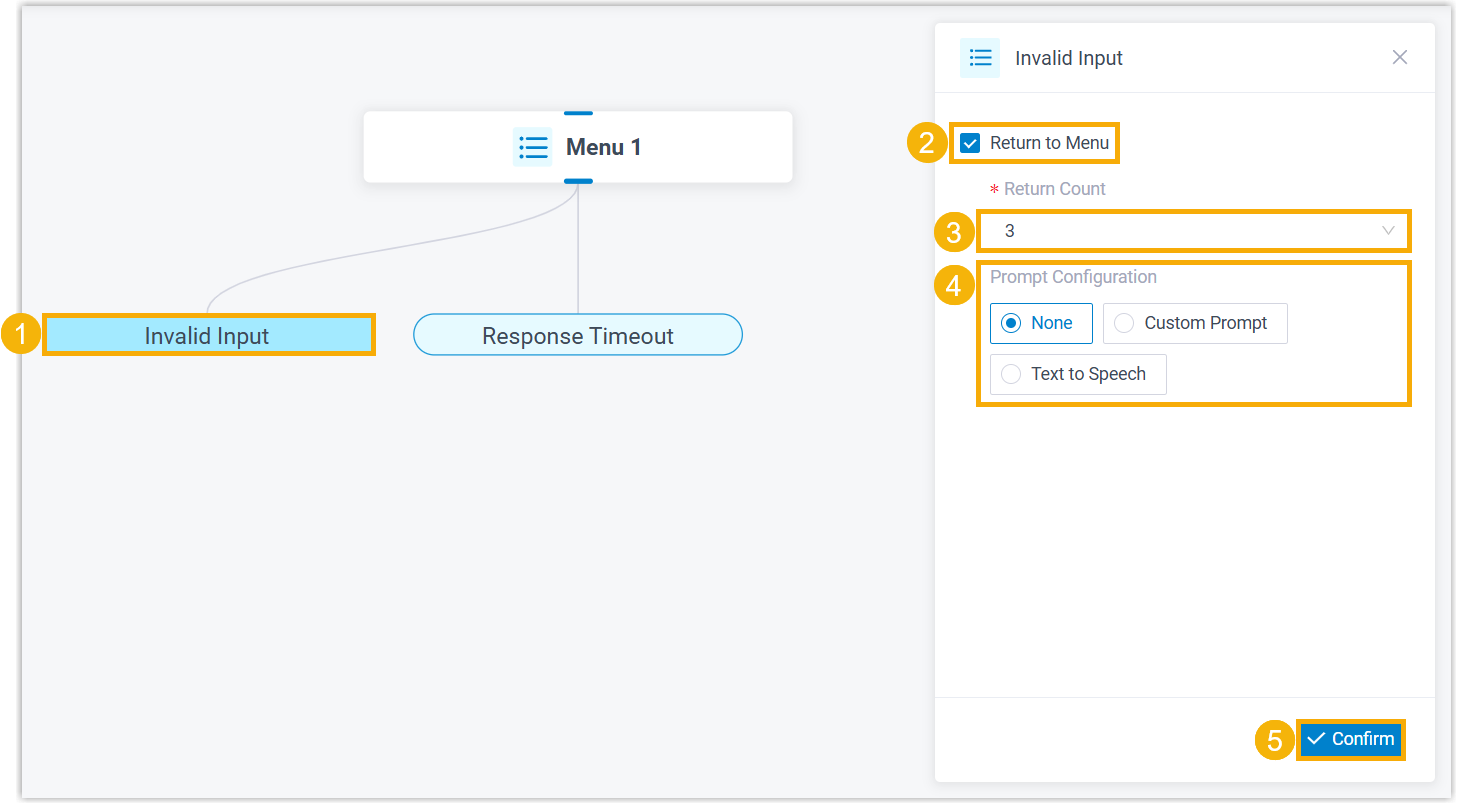
- Click Invalid Input branch.
- In the Return Count drop-down list, select how many times callers can return to the component upon invalid input.
- Set response timeout and retry strategy
- To change the default response timeout or allow callers to return to the component for a retry upon response timeout, complete the following settings.
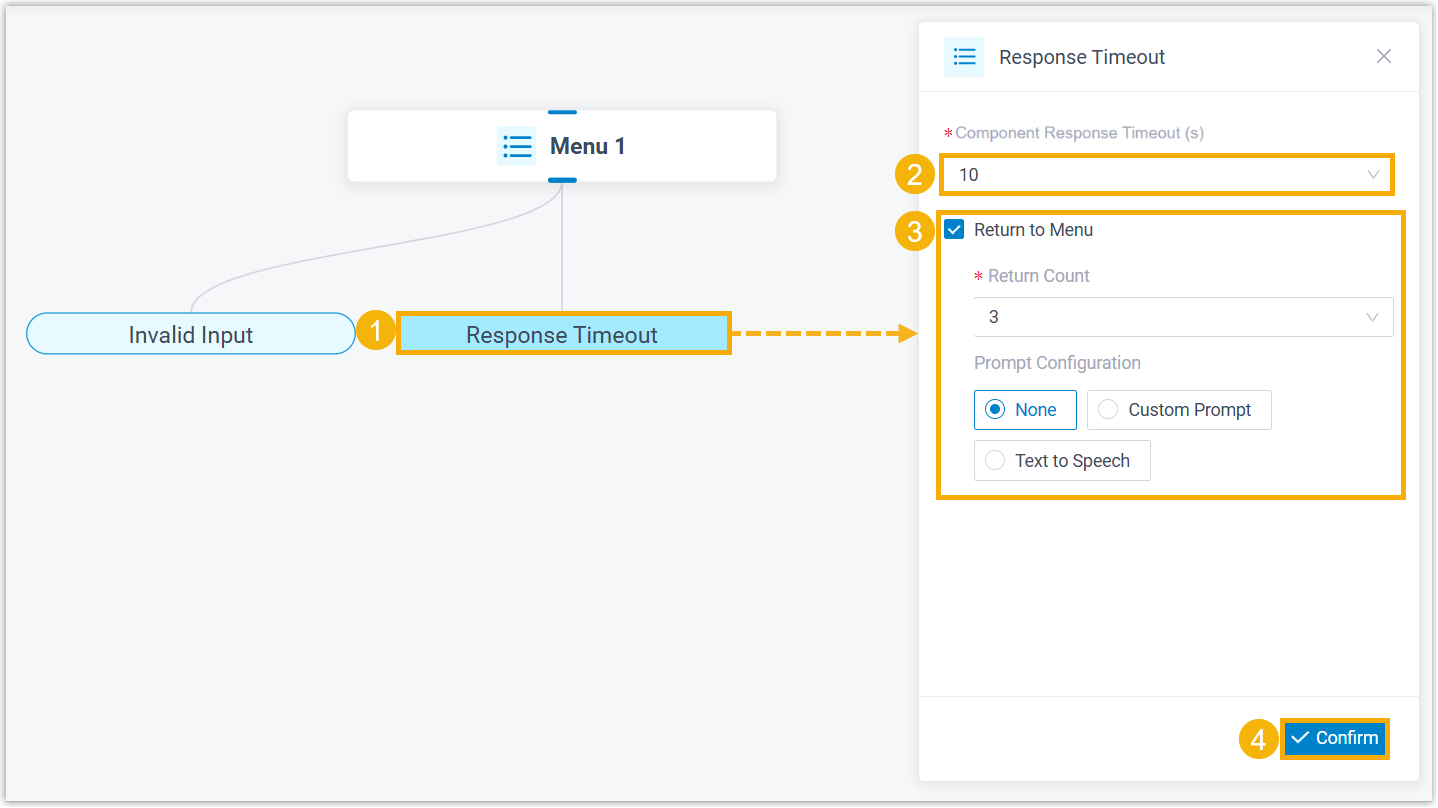
- Click Response Timeout branch.
- In the Response Timeout(s) field, set how long to wait for the caller to operate.
You can select a value from the drop-down list, or enter a value between 1 and 9999.
- Set the retry strategy upon response timeout.
- Select the checkbox of Return to Menu.
- In the Return Count drop-down list, select how many times callers can return to the component upon response timeout.
- Optional: Configure audio prompt(s) or a text-to-speech message to instruct callers to retry.
- At the bottom-right corner, click Confirm.
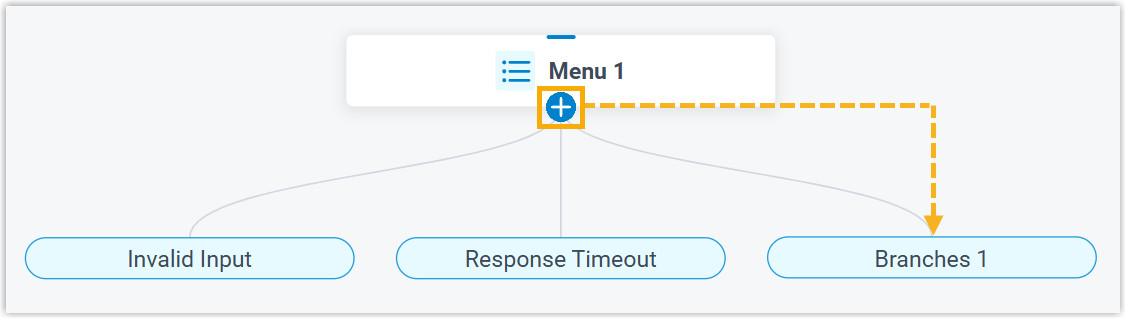
- Set keys for menu options
- Click on the component to add a branch for a key.
- Click the branch to complete its settings.
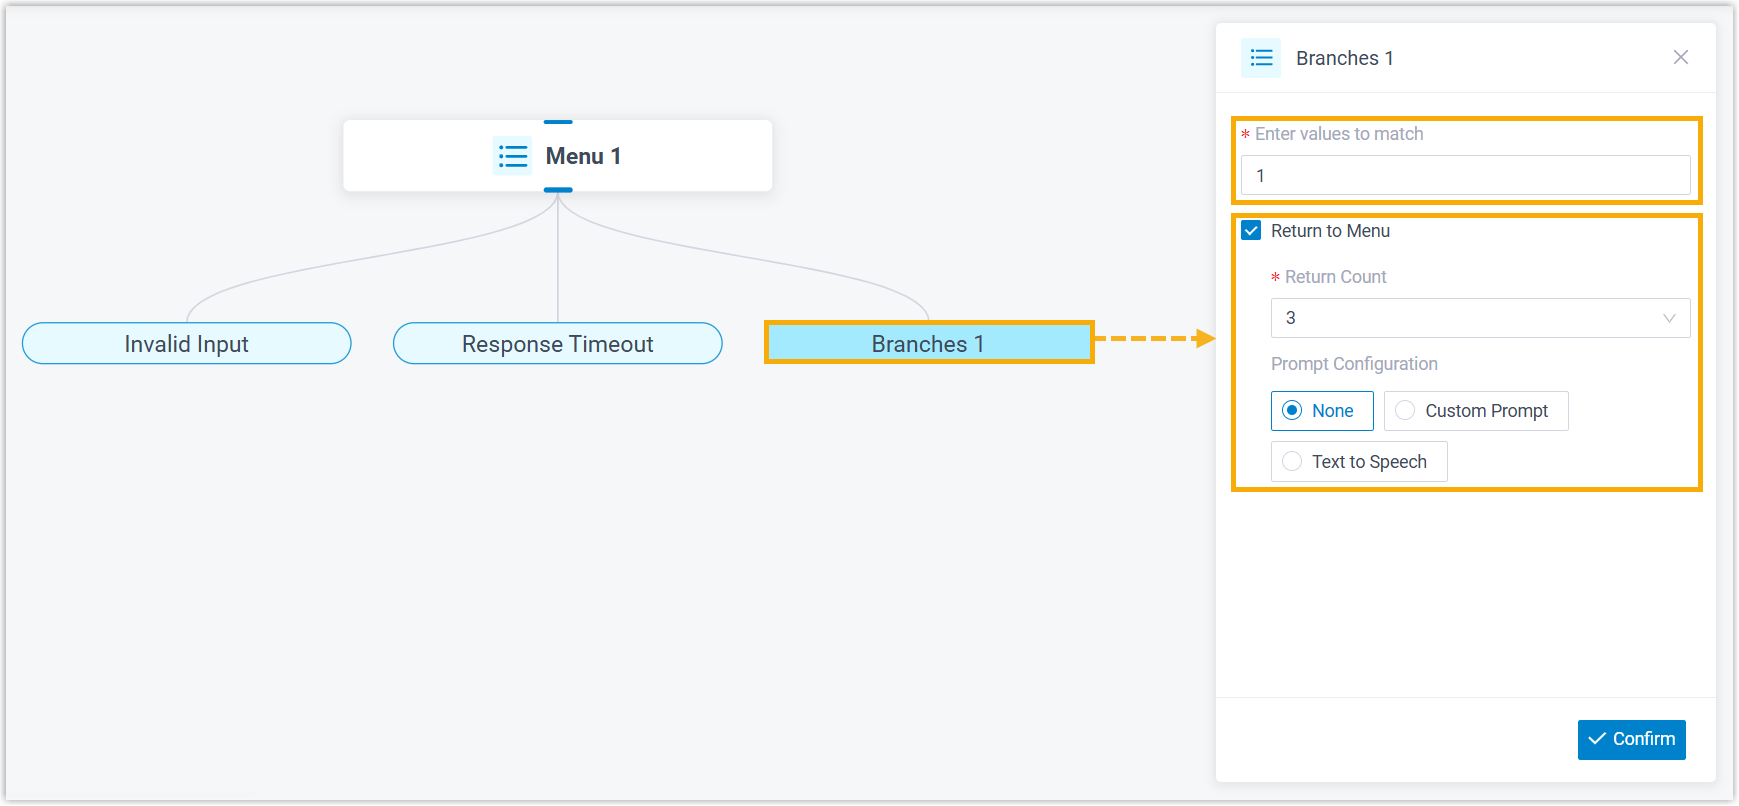
Item Description Enter values to match Enter a value. Return to Menu To allow callers to return to the component, proceed as follows. - Select the checkbox of Return to Menu.
- In the Return Count drop-down list, select how many times callers can return to the component.
- Optional: Configure audio prompt(s) or a text-to-speech message to instruct callers to retry.
- At the bottom-right corner, click Confirm.
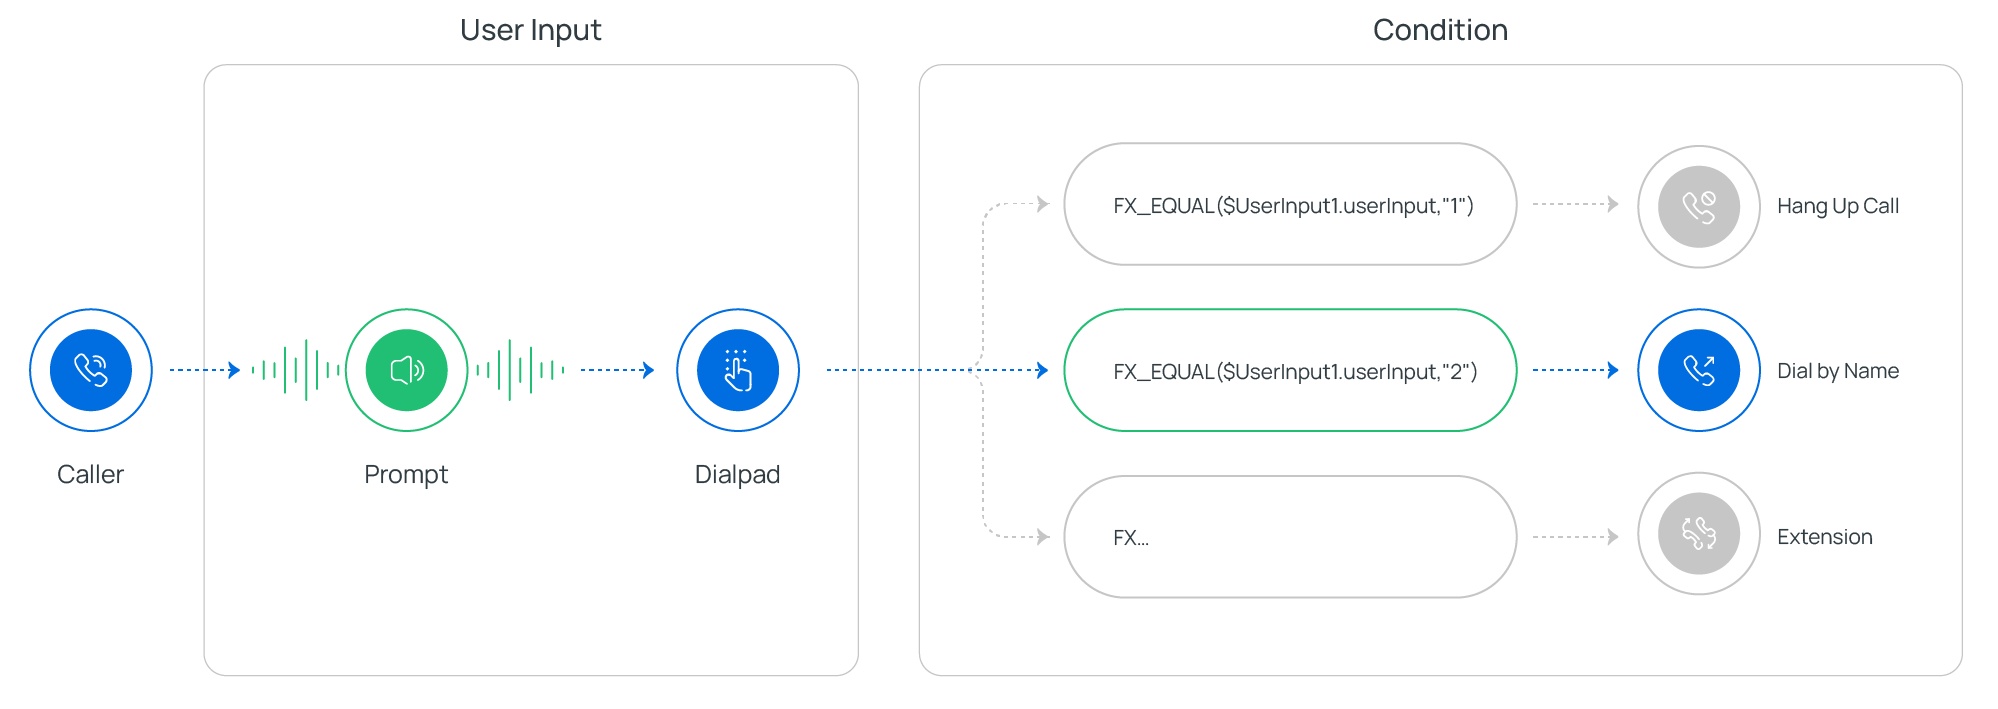
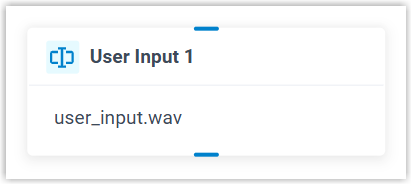
User Input
This topic provides an overview of the User Input component, and describes its configuration, variables, as well as supported connections.
Component introduction
User Input component allows you to collect DTMF digits from callers, typically used with Condition component. The input value is stored in variables, which can be used as input for subsequent components or for condition evaluation.
You can configure when the system stops collecting DTMF digits - either when reaching digit or response timeout or when callers press an end key. Additionally, audio prompt(s) or a text-to-speech message can be set to prompt callers for input.
- Supported prompt types
Prompt Type Description Custom Prompt Choose from existing custom prompts, or create a new one by recording with an extension or uploading an audio file. Music on Hold (MoH) Choose from existing MoH. Note:Before you begin, make sure the desired MoH is configured in PBX Settings > Voice Prompt > Music on Hold.Text to Speech (TTS) Enter the desired text, which will be converted to speech in the selected language and voice style.
Note:Before you begin, make sure the Text-to-Speech feature is enabled in Integrations > AI.
- Supported end keys
#key or*key.- You can set the end key in Call Flow Designer > Options.
Component configuration
- After adding User Input component to a call flow, click User Input component to proceed with the configuration.
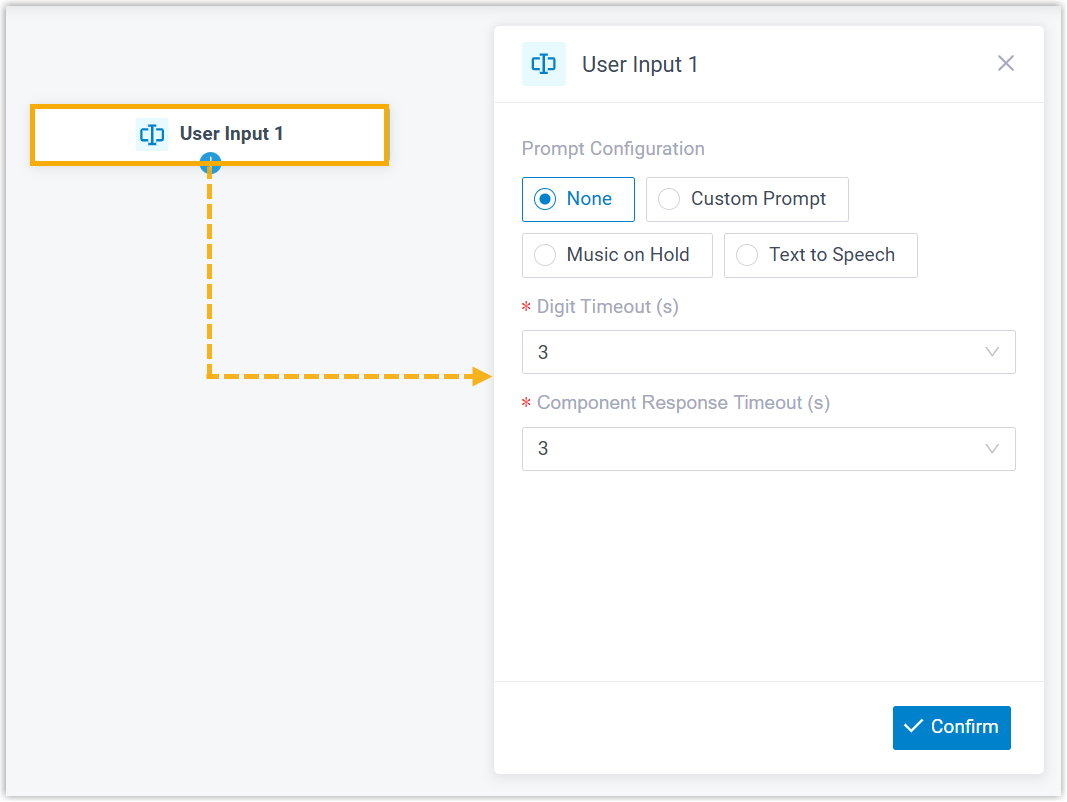
- Optional: Add audio prompt(s) or a text-to-speech message to instruct callers.
Item Description Custom Prompt - Click Custom Prompt.
- Specify custom prompt(s).Note:Up to 5 custom prompts are supported.
- To choose from an existing prompt, select it from the drop-down list of Prompt.
- To use a new prompt, click Record New to record prompt with an extension, or click Upload to upload an audio file.Note:The new prompt will be saved in PBX Settings > Voice Prompt > Custom Prompt.
- Optional: To play the custom prompt(s) in a loop, select the checkbox of Enable Loop Playback.Note:The looped prompt will be overridden if the next connected component is configured with a prompt.
Music on Hold (MoH) - Select Music on Hold.
- Select an existing MoH from the drop-down list of Music on Hold.
Note:The MoH will be overridden if the next connected component is configured with a prompt.Text to Speech (TTS) - Select Text to Speech.
- Complete the rest of the configurations.
The system will convert the text into speech based on the settings.
Note:The new speech will be saved to the system and synchronized to PBX Settings > Voice Prompt > Custom Prompt.
- Configure the timeout for user input.
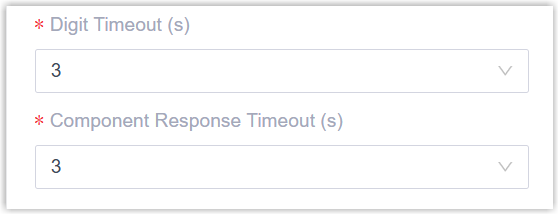
- Digit Timeout(s): Set how long to wait for the caller to enter the next digit.
You can select a value from the drop-down list, or enter a value between 1 and 9999.
- Response Timeout(s): Set how long to wait for the caller to operate.
You can select a value from the drop-down list, or enter a value between 1 and 9999.
- At the bottom-right corner, click Confirm.
The selected prompt will appear on the component.
Language
This topic provides an overview of the Language component, and describes its restriction, configuration, as well as supported connections.
Component restriction
Component setting has lower priority than extension-specific setting.
If the caller is an internal extension whose system prompt language (configured in Extension and Trunk > Extension > Language > System Prompt Language) differs from the language set in Language component, the extension's system prompt language will take precedence.
Component introduction
After setting up a call flow, the system plays system prompts in English by default. Language component allows you to change the system prompt language for subsequent components in the call flow, overriding the default language setting.
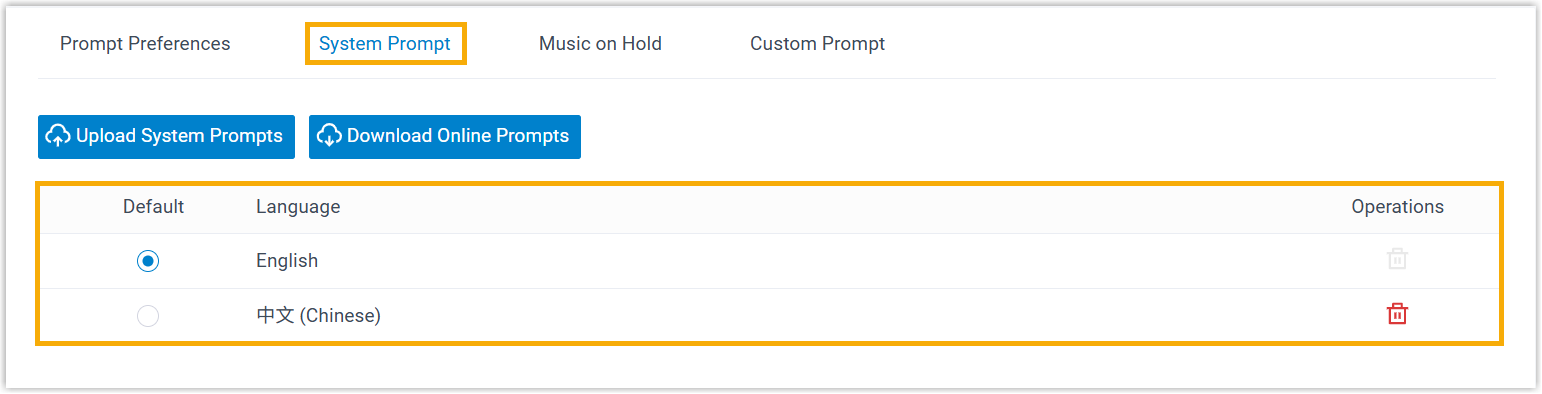
- Supported languages
- By default, only English is available. To use another language, download the desired language in PBX Settings > Voice Prompt > System Prompt before configuring the component.
Component configuration
- After adding Language component to a call flow, click Language component to proceed with the configuration.
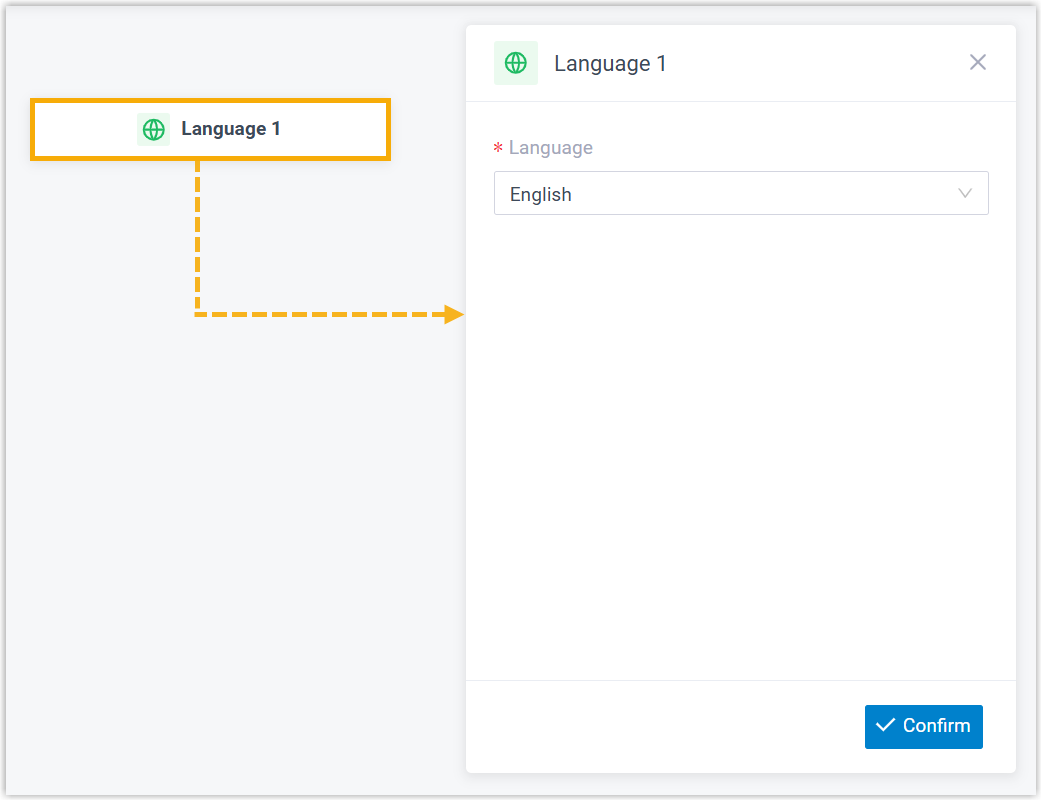
- In the Language drop-down list, select a language.
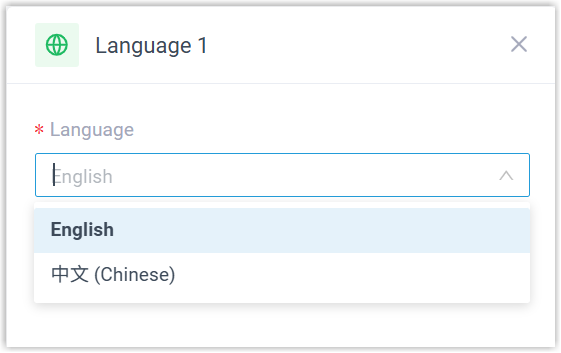
- At the bottom-right corner, click Confirm.
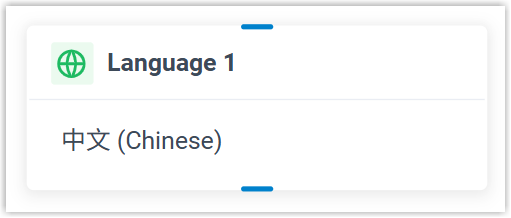
The selected language will appear on the component.
Record
This topic provides an overview of the Record component, and describes its requirement, configuration, as well as supported connections.
Component requirement
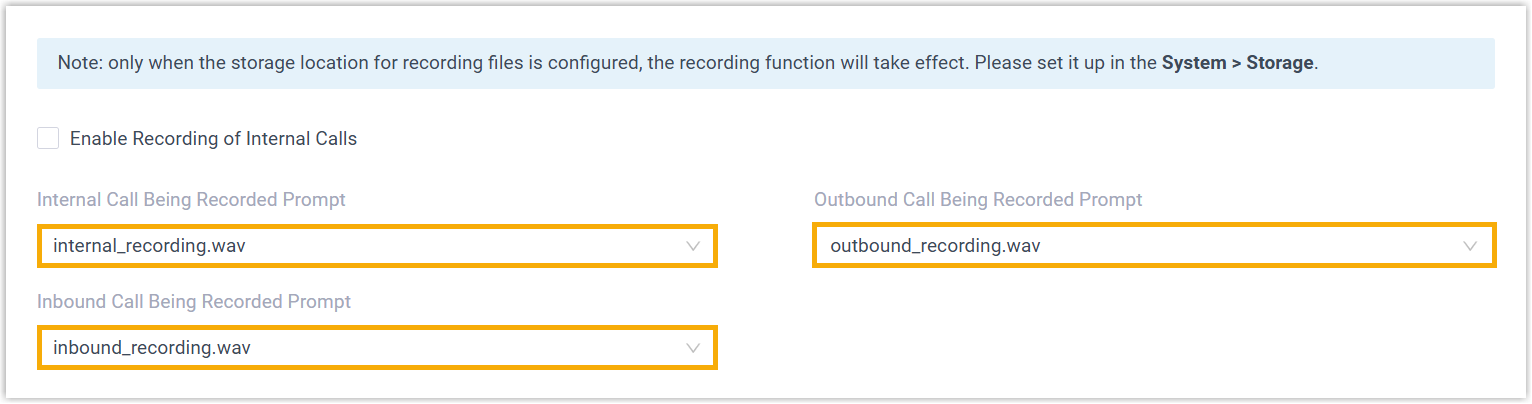
Record component requires a storage location to save recording files.
You can store recording files on local storage, an external device, or a network drive. For centralized management or backup, you can also archive the files to external servers such as Amazon S3, Google Cloud Storage, FTP server, or SFTP server.
For more information, see the following topics:- (Required) Set Storage Location for Recording Files.
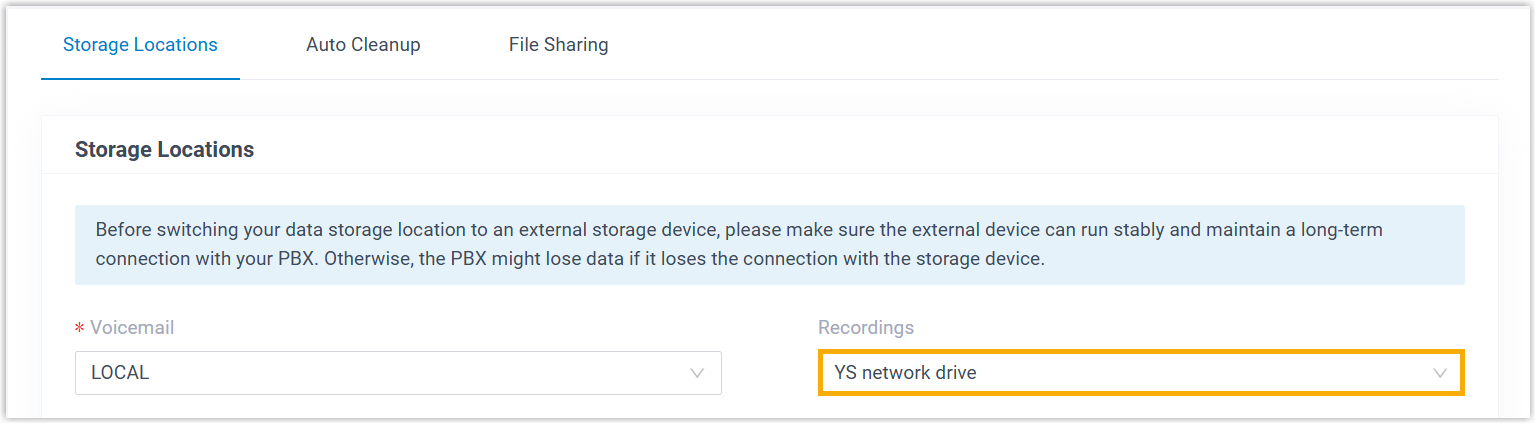
- (Optional) Archive Recording Files to External Server.
Component introduction
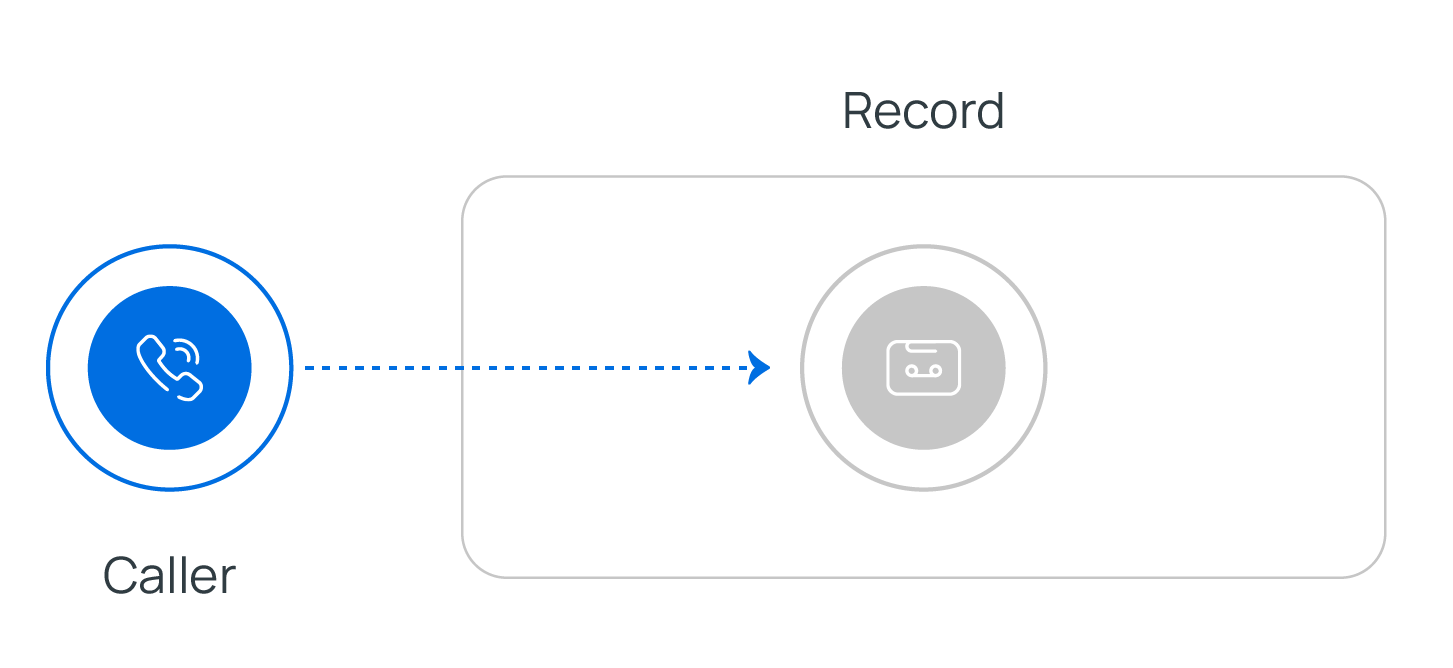
Record component allows you to start recording a call upon the caller being connected to another participant, and optionally configure prompts to inform call participants at the start and during the recording.
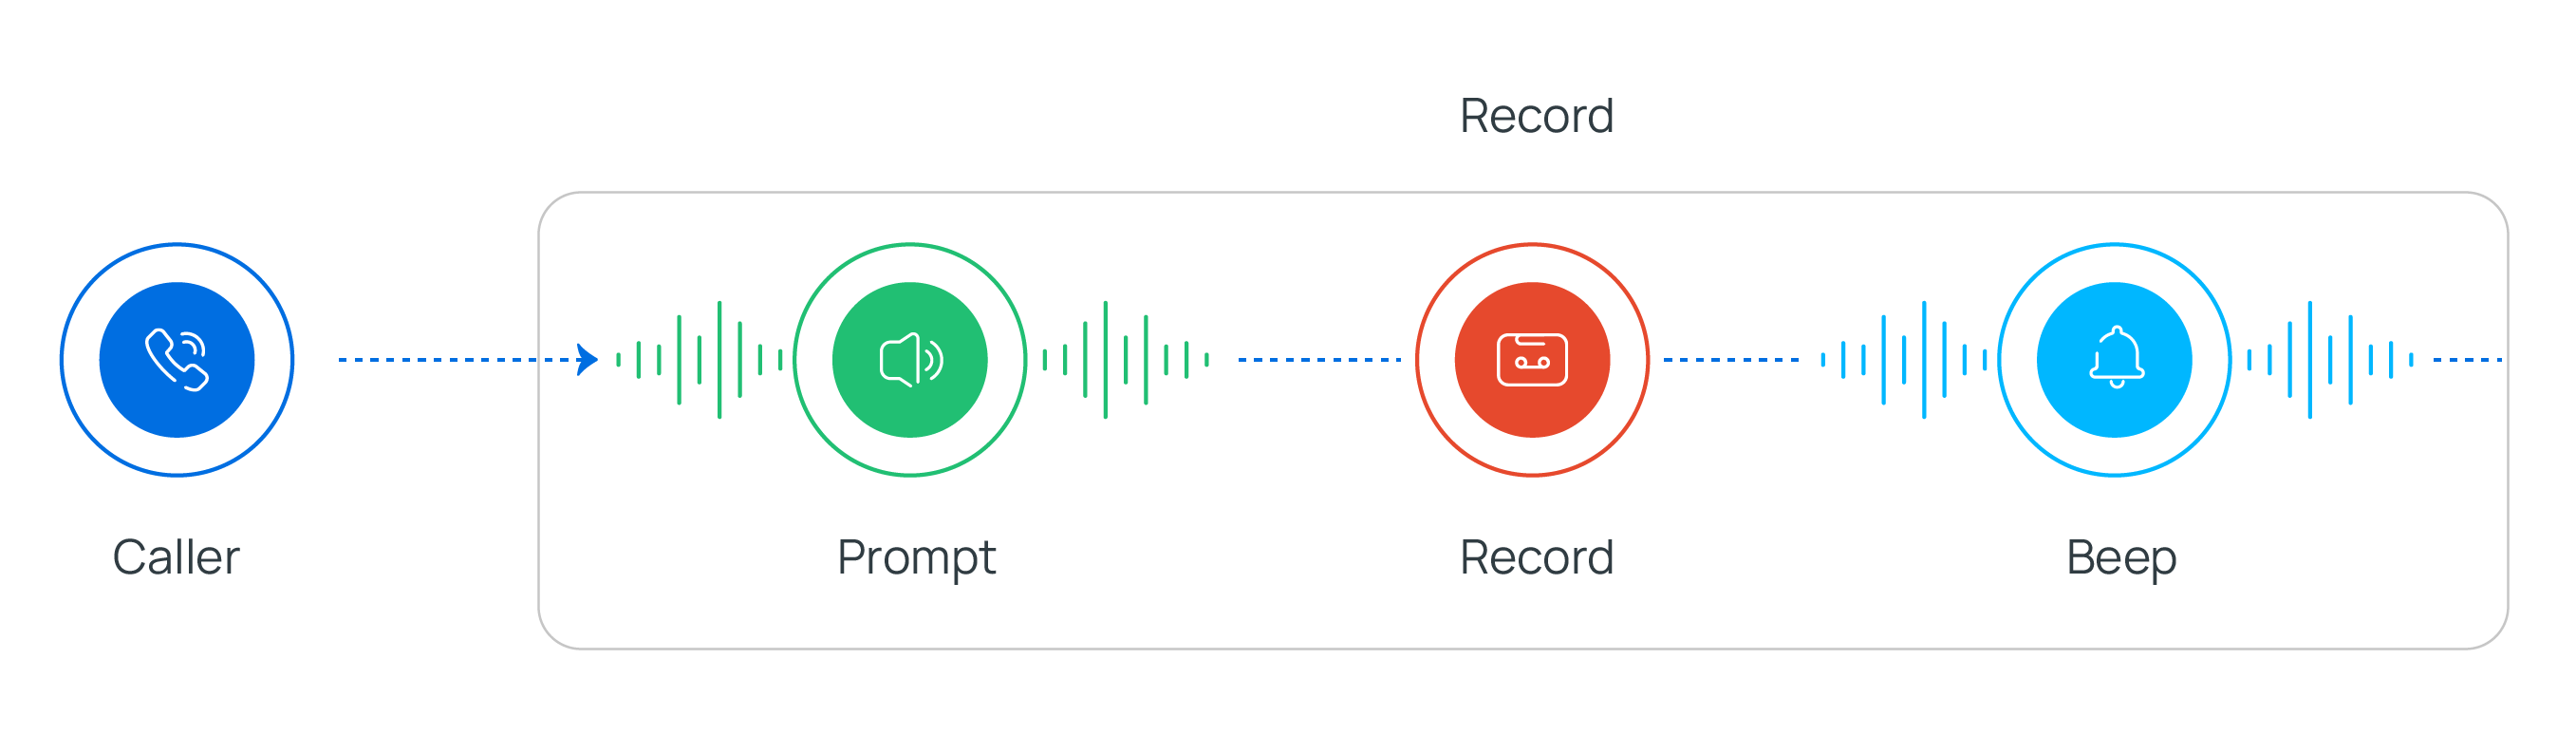 Note:Once call recording is enabled, you can NOT use another Record component to pause or stop the recording. However, authorized extension users can change the recording status according to their permissions (Path: Extension and Trunk > Extension > Features > Call Recording).
Alternatively, you can use the component to disable call recording for calls that are supposed to be recorded.
- Supported prompt types
Prompt Type Description Custom Prompt Choose from existing custom prompts, or create a new one by recording with an extension or uploading an audio file. Text to Speech (TTS) Enter the desired text, which will be converted to speech in the selected language and voice style.
Note:Before you begin, make sure the Text-to-Speech feature is enabled in Integrations > AI.
Component configuration
- After adding Record component to a call flow, click Record component to proceed with the configuration.
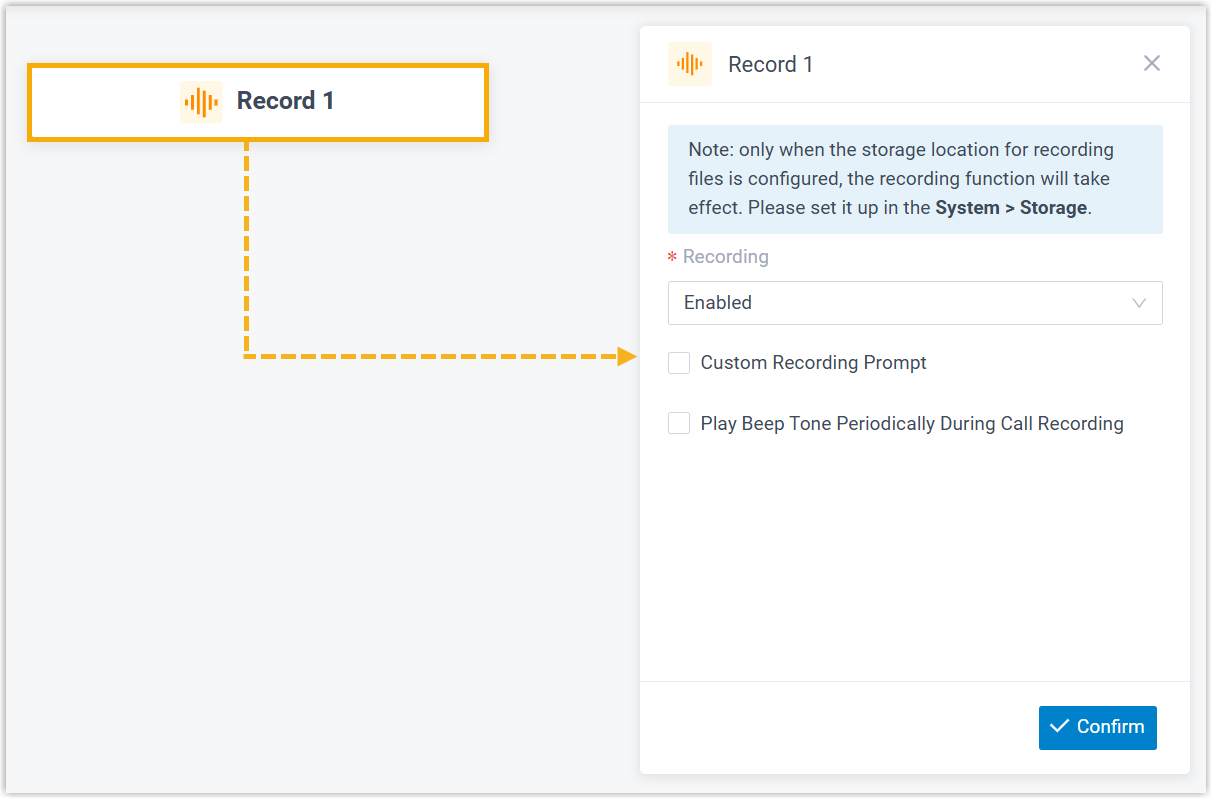
- In the Recording drop-down list, select an option to enable or disable call recording.

- If call recording is enabled, you can configure prompts to inform call participants of the recording.Note:
- For Conference Call and Multi-party Call, call participants will not hear the prompt.
- If no custom prompt is configured, the system will use the global prompt for recording (Path: Call Features > Recording), if available.
- Play prompt at the start of call recording
- You can play audio prompt(s) or a text-to-speech message to inform call participants when call recording starts.
Item Description Custom Prompt 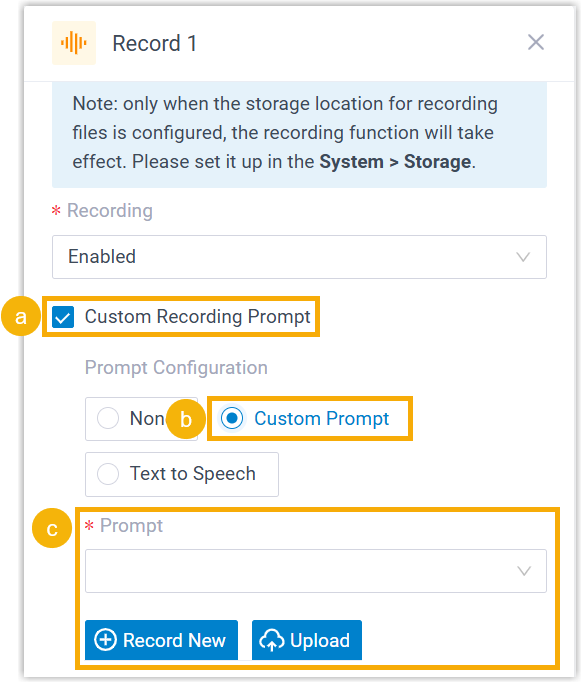
- Select the checkbox of Custom Recording Prompt.
- Click Custom Prompt.
- Specify custom prompt(s).Note:Up to 5 custom prompts are supported.
- To choose from an existing prompt, select it from the drop-down list of Prompt.
- To use a new prompt, click Record New to record prompt with an extension, or click Upload to upload an audio file.Note:The new prompt will be saved in PBX Settings > Voice Prompt > Custom Prompt.
Text to Speech (TTS) 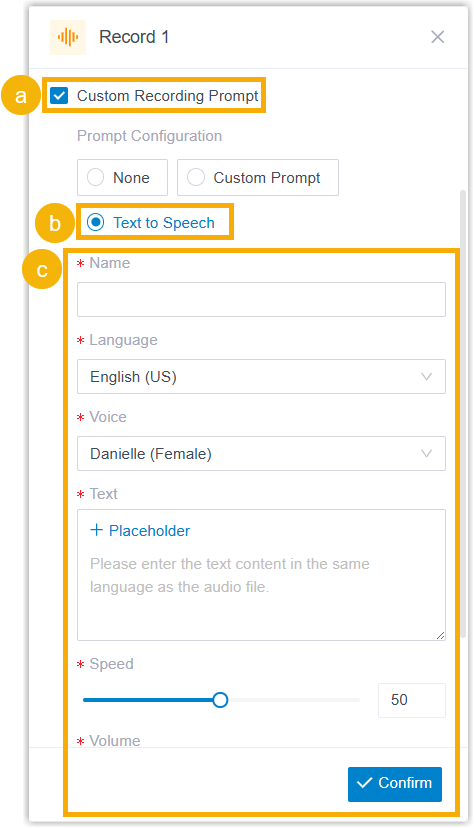
- Select the checkbox of Custom Recording Prompt.
- Select Text to Speech.
- Complete the rest of the configurations.
The system will convert the text into speech based on the settings.
Note:The new speech will be saved to the system and synchronized to PBX Settings > Voice Prompt > Custom Prompt.
- Play prompt during call recording
- You can play beep tones during call recording to inform call participants that the call is being recorded.
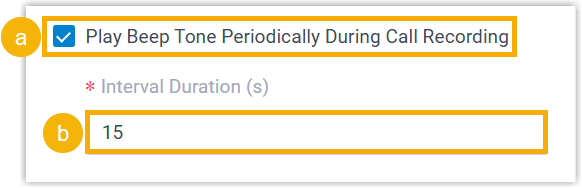
- Select the checkbox of Play Beep Tone Periodically During Call Recording.
- In the Interval Duration(s) field, enter the interval in seconds.
- At the bottom-right corner, click Confirm.
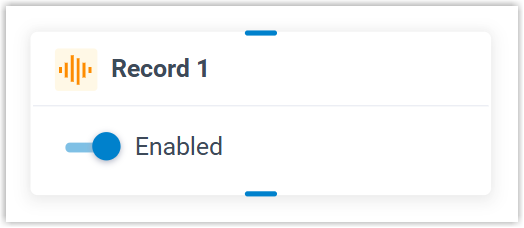
The recording status will appear on the component.
Dial by Number
This topic provides an overview of the Dial by Number component, and describes its configuration as well as supported connections.
Component introduction
Dial by Number component allows callers to directly dial a number to reach the destination.You can configure when the system stops accepting caller input - either when reaching digit or response timeout or when callers press an end key. Additionally, audio prompt(s) or a text-to-speech message can be set to prompt callers for input.
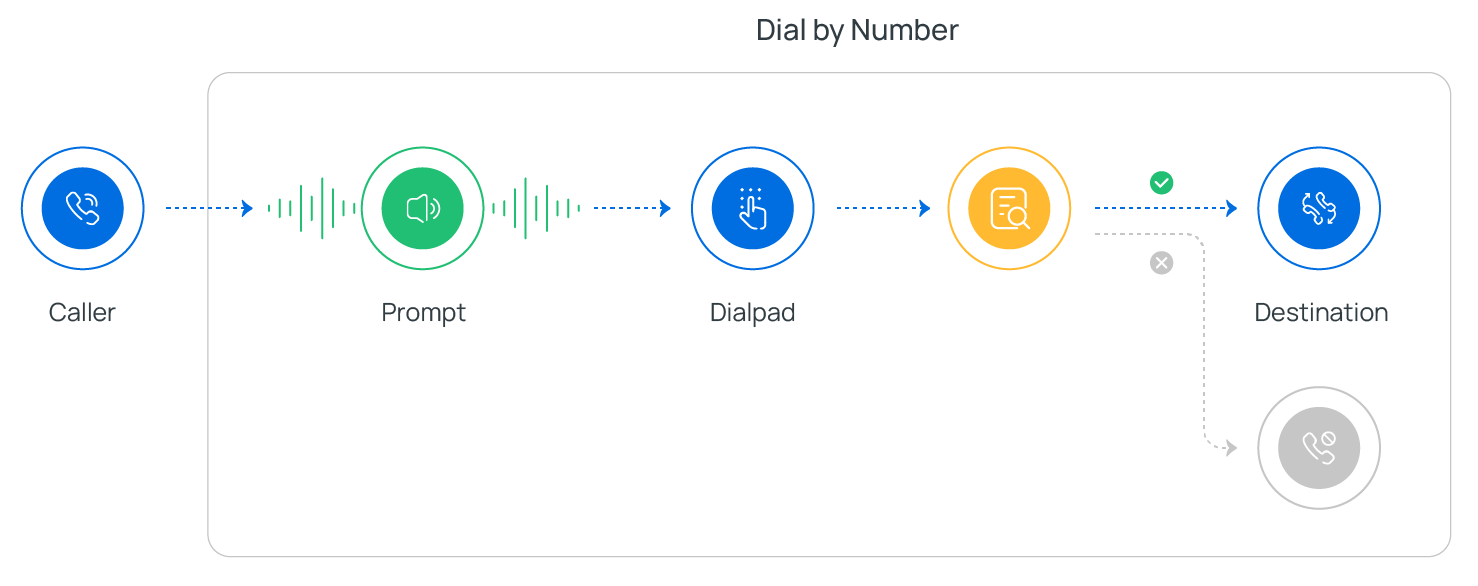
- Supported destinations
- Extension
- Ring Group
- Queue
- Conference
- Call Flow
- Paging
- IVR
- External Number
- Check Voicemail (Extension Voicemail or Group Voicemail)
- Supported prompt types
Prompt Type Description Custom Prompt Choose from existing custom prompts, or create a new one by recording with an extension or uploading an audio file. Music on Hold (MoH) Choose from existing MoH. Note:Before you begin, make sure the desired MoH is configured in PBX Settings > Voice Prompt > Music on Hold.Text to Speech (TTS) Enter the desired text, which will be converted to speech in the selected language and voice style.
Note:Before you begin, make sure the Text-to-Speech feature is enabled in Integrations > AI.- Supported end keys
#key or*key.- You can set the end key in Call Flow Designer > Options.
Component configuration
After adding Dial by Number component to a call flow, you can configure the numbers that callers are allowed to dial, as well as the retry strategy for invalid user input.- Specify the numbers that callers can dial
- Click Dial by Number component to proceed with the configuration.
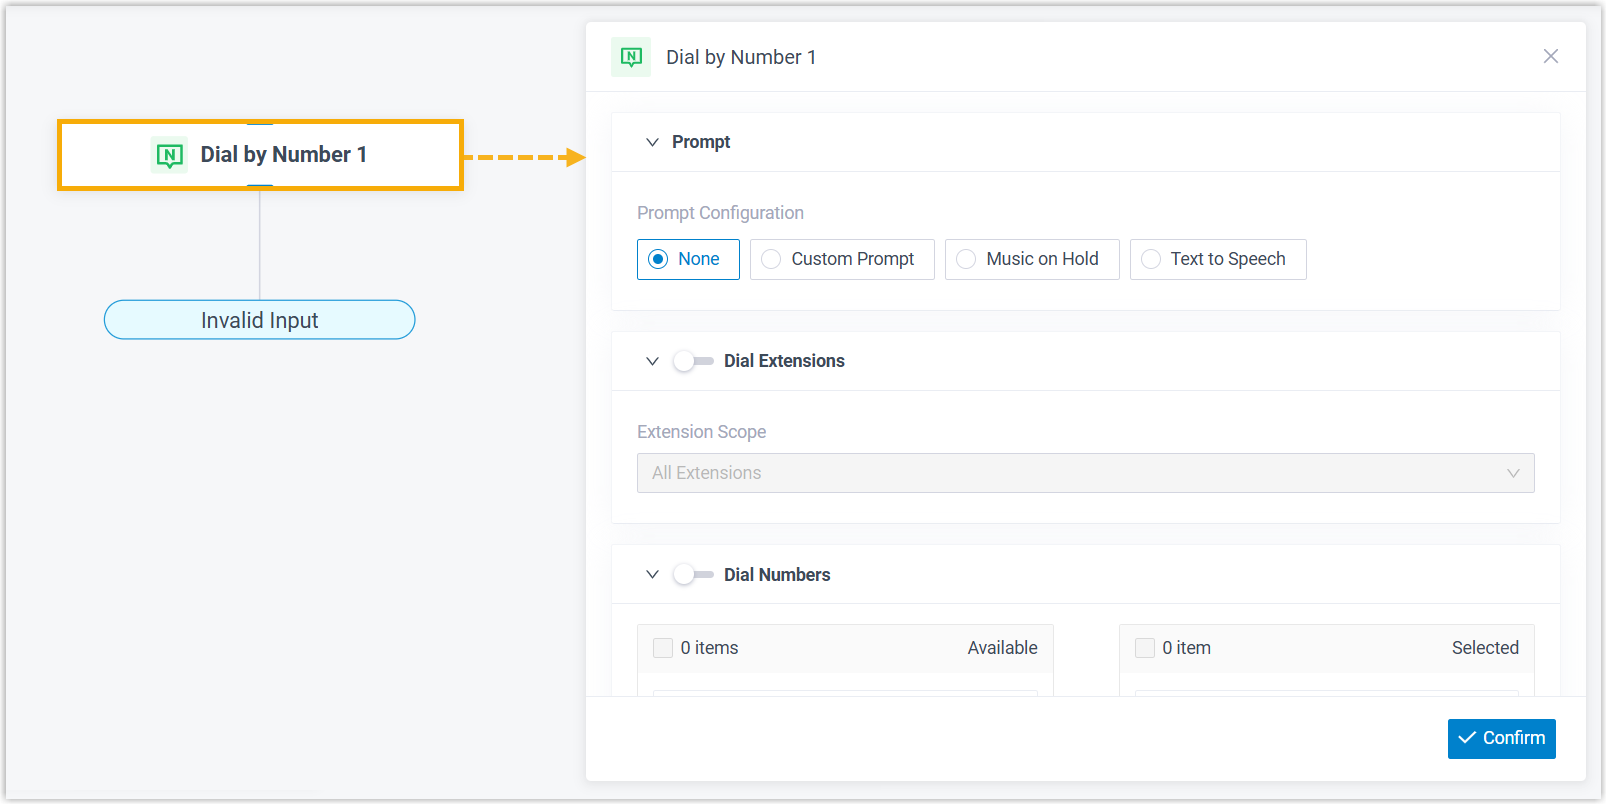
- Configure audio prompt(s) or a text-to-speech message to instruct callers.
Item Description Custom Prompt - Click Custom Prompt.
- Specify custom prompt(s).Note:Up to 5 custom prompts are supported.
- To choose from an existing prompt, select it from the drop-down list of Prompt.
- To use a new prompt, click Record New to record prompt with an extension, or click Upload to upload an audio file.Note:The new prompt will be saved in PBX Settings > Voice Prompt > Custom Prompt.
- Optional: To play the custom prompt(s) in a loop, select the checkbox of Enable Loop Playback.Note:The looped prompt will be overridden if the next connected component is configured with a prompt.
Music on Hold (MoH) - Select Music on Hold.
- Select an existing MoH from the drop-down list of Music on Hold.
Note:The MoH will be overridden if the next connected component is configured with a prompt.Text to Speech (TTS) - Select Text to Speech.
- Complete the rest of the configurations.
The system will convert the text into speech based on the settings.
Note:The new speech will be saved to the system and synchronized to PBX Settings > Voice Prompt > Custom Prompt.
- Specify the numbers that callers can dial upon reaching the component.
Item Description Dial Extensions 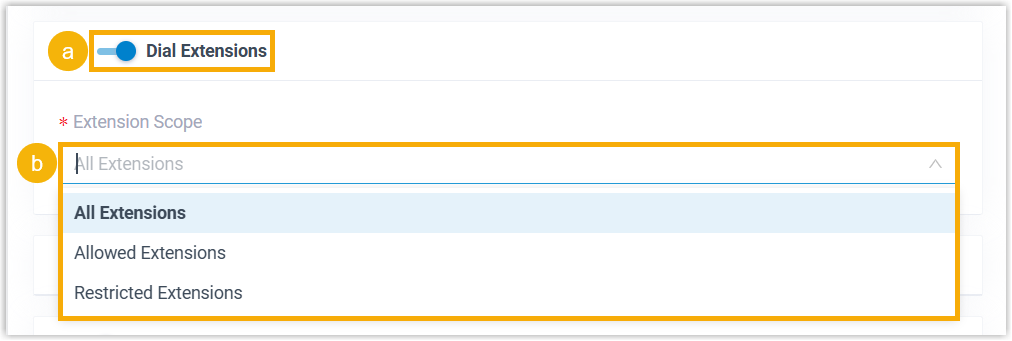
- Turn on the switch of Dial Extensions.
- In the Extension Scope drop-down list, select an option.
- All Extensions: Allow callers to dial all extensions.
- Allowed Extensions: Allow callers to dial only specific extensions.
If you choose this option, select the allowed extensions from Available box to Selected box.
- Restricted Extensions: Allow callers to dial all extensions EXCEPT the selected ones.
If you choose this option, select the restricted extensions from Available box to Selected box.
Dial Numbers 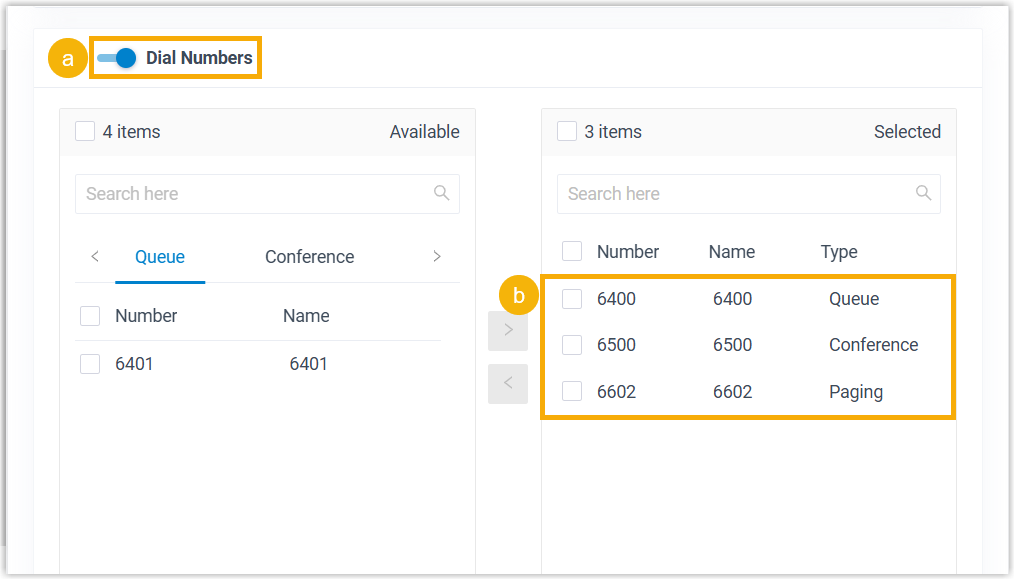
- Turn on the switch of Dial Numbers.
- Select the desired numbers from Available box to Selected box.
Dial External Number 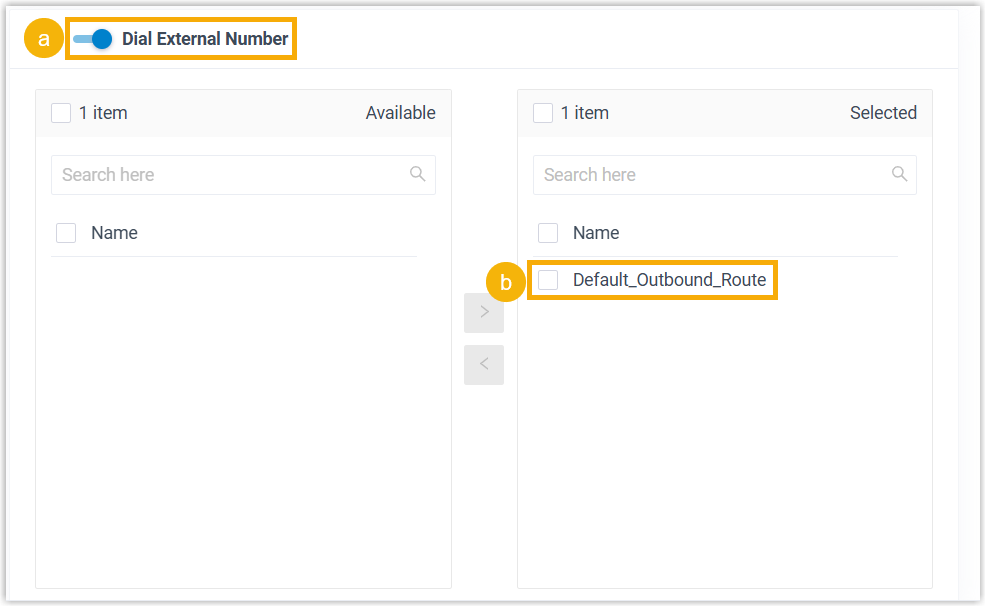
- Turn on the switch of Dial External Number.
- Select the desired outbound routes from Available box to Selected box.
Dial to Check Voicemail 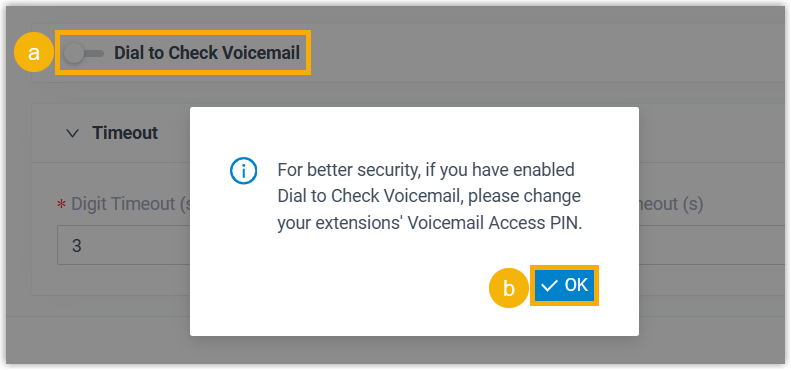
- Turn on the switch of Dial to Check Voicemail.
- In the pop-up window, click OK.
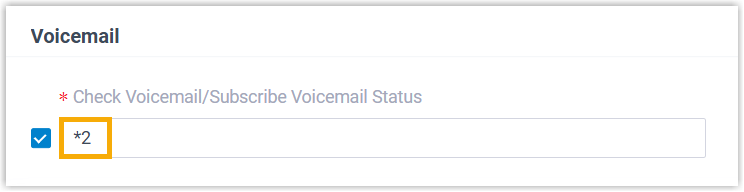
Callers can access extension voicemail or group voicemail by dialing "Check Voicemail Feature Code + Extension Number/Group Voicemail Number", followed by the voicemail access PIN.
Note:To change the feature code or access PIN, proceed as follows:- Check Voicemail Feature Code: The default feature code is
*2.To change it, go to Call Features > Feature Code > Voicemail > Check Voicemail/Subscribe Voicemail Status.
- Extension Voicemail Access PIN: To change the PIN, go to Extension and Trunk > Extension > Voicemail > Voicemail Access PIN.

- Group Voicemail Access PIN: To change the PIN, go to Call Features > Voicemail > Group Voicemail > Voicemail Access PIN.
- Check Voicemail Feature Code: The default feature code is
- Configure the timeout for user input.
- Digit Timeout(s): Set how long to wait for the caller to enter the next digit.
You can select a value from the drop-down list, or enter a value between 1 and 9999.
- Response Timeout(s): Set how long to wait for the caller to operate.
You can select a value from the drop-down list, or enter a value between 1 and 9999.
- Specify retry strategy for invalid input
- Click Invalid Input branch.
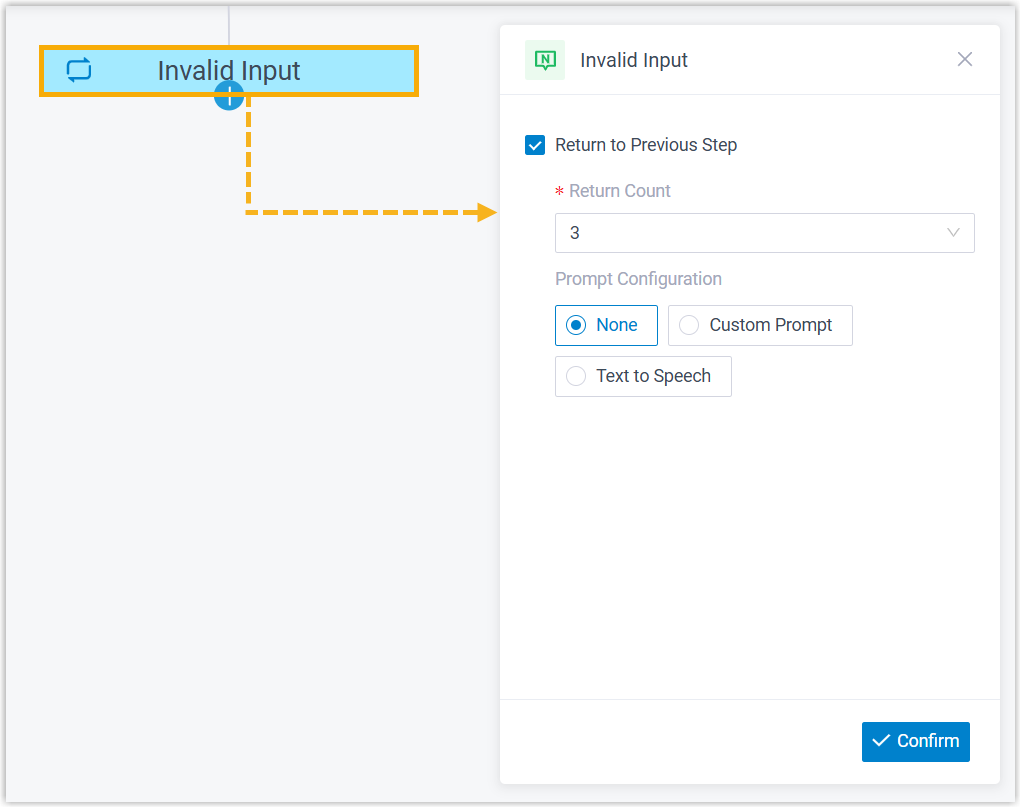
- Select the checkbox of Return to Previous Step.
- In the Return Count drop-down list, select how many times callers can return to the component upon invalid input.
- Optional: Configure audio prompt(s) or a text-to-speech message to instruct callers to retry dialing.
- At the bottom-right corner, click Confirm.
Dial by Name
This topic provides an overview of the Dial by Name component, and describes its configuration, usage example, as well as supported connections.
Component introduction
Dial by Name component is one of the end components to terminate caller's connection to the current call flow. It allows callers to reach extension user by entering the first three letters of the user's name.
Component configuration
No configuration is needed for this component.
However, to ensure that callers can successfully reach extension users, make sure the following settings are properly configured.
- Set Caller ID Name for extension.
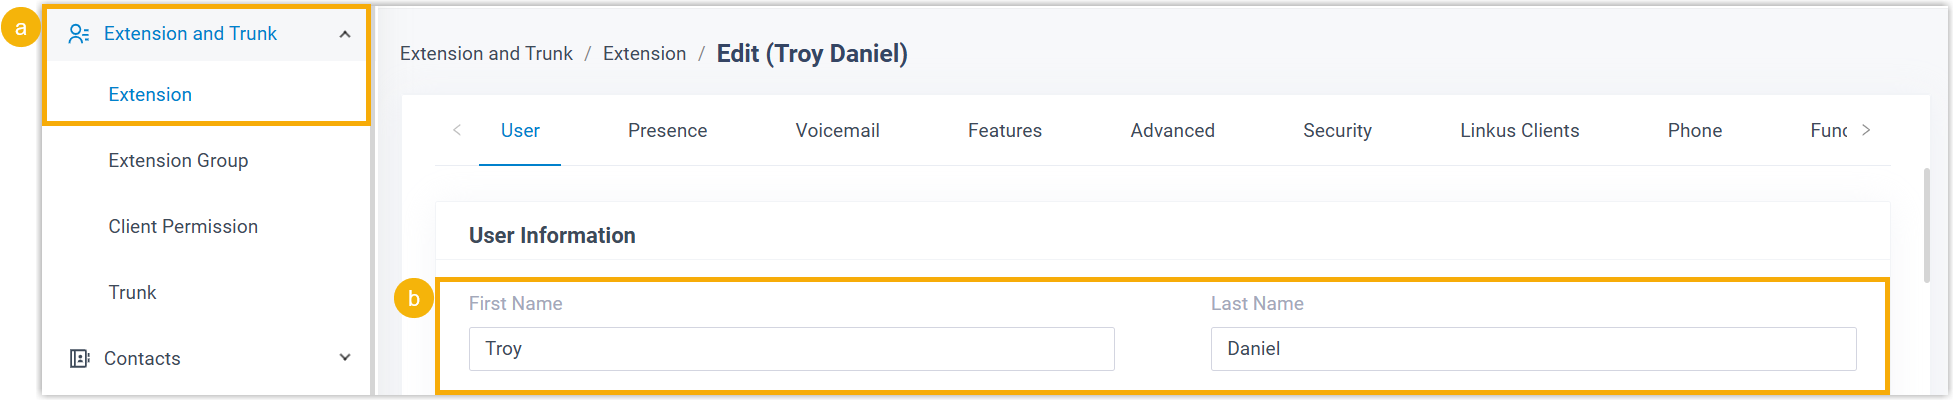
- Go to Extension and Trunk > Extension, edit desired extension(s).
- In the User Information section, enter the user's first name and last name.
- Set display format for extension's Caller ID Name.

- Go to PBX Settings > Preferences.
- In the Name Display Format drop-down list, select a display format.
- To allow callers to reach extension users by first name, select First Name Last Name with Space Inbetween.
- To allow callers to reach extension users by last name, select Last Name First Name with Space Inbetween or Last Name First Name without Space Inbetween.
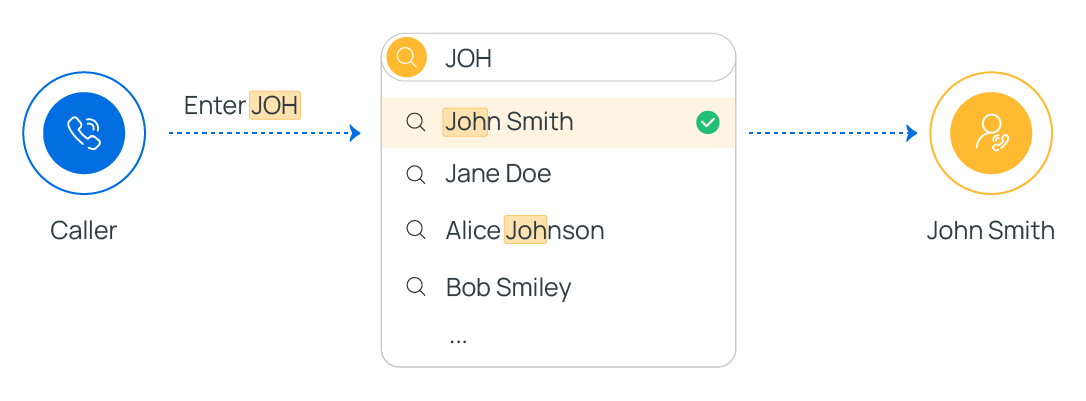
When callers enter 3 letters, the system will search from the beginning of extensions' Caller ID Names based on the selected format.
Component usage example
When a caller reaches the Dial by Name component, the system guides the caller through the following process to search for an extension user.
- The system plays the announcement "Welcome to the directory. Please enter the first three letters of your party's first or last name, using your touchtone keypad, use the 7 key for Q, and the 9 key for Z" to prompt caller for input.
- The caller enters the first three letters of an extension user's first name.Tip:For example, to search for "Phillips Huff", the caller needs to enter 7-4-4 (corresponding to
PHI). - The system looks for the best match and plays the corresponding announcement.
- If no match is found, the system plays the announcement "No directory entries match your search".
- If one or more matches are found, the system plays the announcement "[Name] extension [Number] If this is the person you are looking for, press 1 now, otherwise please press star now", then continue based on caller's input.
- If the caller presses 1, the system will route the call to the extension user.
- If the caller presses *, the system will continue the next match and make announcement. If no more matches, the system plays the announcement "There are no more compatible entries in the directory".
Transfer
This topic provides an overview of the Transfer component, and describes its configuration as well as supported connections.
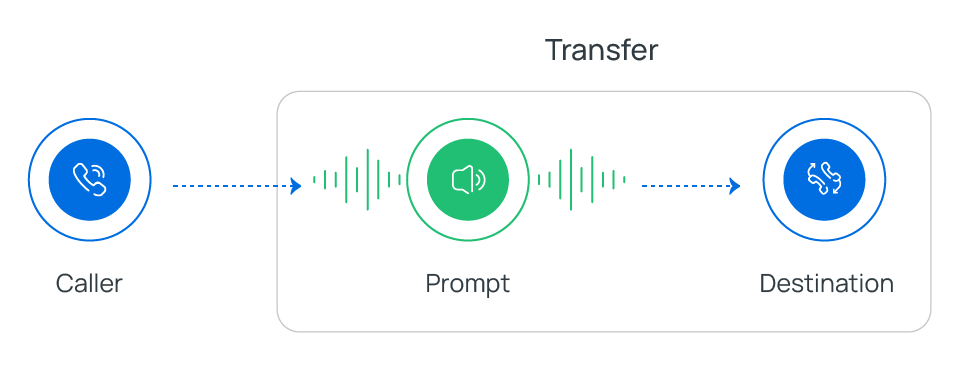
Component introduction
Transfer component is one of the end components to terminate caller's connection to the current call flow. It allows you to blind transfer callers to a designated destination, and optionally configure prompts to inform them of the transfer.
- Supported transfer destinations
- Extension
- Extension Voicemail
- Ring Group
- Queue
- Group Voicemail
- Conference
- External Number
- Call Flow
- Custom
- Supported prompt types
Prompt Type Description Custom Prompt Choose from existing custom prompts, or create a new one by recording with an extension or uploading an audio file. Music on Hold (MoH) Choose from existing MoH. Note:Before you begin, make sure the desired MoH is configured in PBX Settings > Voice Prompt > Music on Hold.Text to Speech (TTS) Enter the desired text, which will be converted to speech in the selected language and voice style.
Note:Before you begin, make sure the Text-to-Speech feature is enabled in Integrations > AI.
Component configuration
After adding Transfer component to a call flow, click Transfer component to proceed with the configuration.
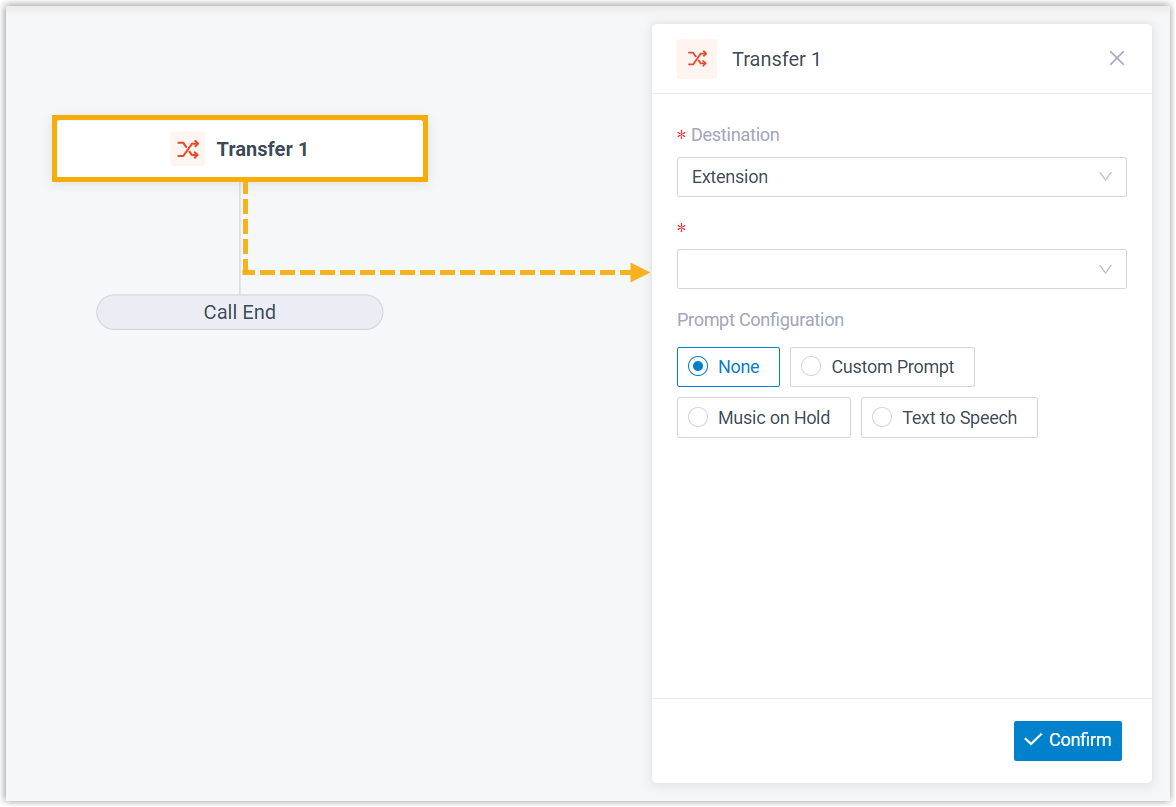
- In the Destination drop-down lists, specify the destination where callers will be transferred.
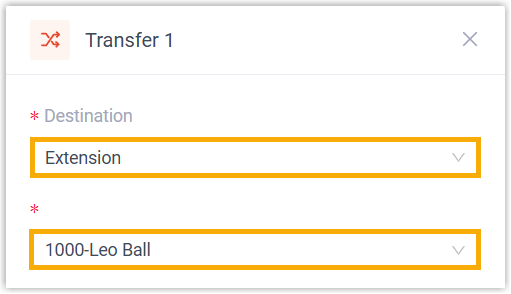
Option Description Extension Transfer incoming calls to a specific extension. Extension Voicemail Transfer incoming calls to a specific extension's voicemail. Ring Group Transfer incoming calls to a specific ring group. Queue Transfer incoming calls to a specific queue. Group Voicemail Transfer incoming calls to a specific group voicemail. Conference Transfer incoming calls to a specific conference. External Number Transfer incoming calls to a specific external number. Call Flow Transfer incoming calls to a specific call flow. Custom Transfer incoming calls to a custom destination. You can specify the destination in either of the following ways:- Directly specify a specific number: In the Destination Number field, enter a specific number.
- Dynamically specify a number: Click
 to configure an expression.
Example:
$HttpRequest1.responseContentIn this example, the system retrieves the on-duty phone number from a web-based calendar via the upstream HTTP Request 1 component, and routes incoming calls to that number.
Note:For more information about the expression, see Variables and Functions in Yeastar Expression.
If the custom destination has a voicemail box (e.g. extension voicemail or group voicemail), you can additionally enable Transfer to Voicemail to allow callers to reach the mailbox directly.
Note:For External Number: If Filter Number is enabled (Path: PBX Settings > Preferences), the system will automatically remove all special characters (except digits,+,*, and#) from the custom number before sending to the trunk. - Optional: Configure audio prompt(s) or a text-to-speech message to inform callers of the call transfer.
Item Description Custom Prompt - Click Custom Prompt.
- Specify custom prompt(s).Note:Up to 5 custom prompts are supported.
- To choose from an existing prompt, select it from the drop-down list of Prompt.
- To use a new prompt, click Record New to record prompt with an extension, or click Upload to upload an audio file.Note:The new prompt will be saved in PBX Settings > Voice Prompt > Custom Prompt.
- Optional: To play the custom prompt(s) in a loop, select the checkbox of Enable Loop Playback.Note:The looped prompt will be overridden if the next connected component is configured with a prompt.
Music on Hold - Select Music on Hold.
- Select an existing MoH from the drop-down list of Music on Hold.
Text to Speech (TTS) - Select Text to Speech.
- Complete the rest of the configurations.
The system will convert the text into speech based on the settings.
Note:The new speech will be saved to the system and synchronized to PBX Settings > Voice Prompt > Custom Prompt.
- At the bottom-right corner, click Confirm.
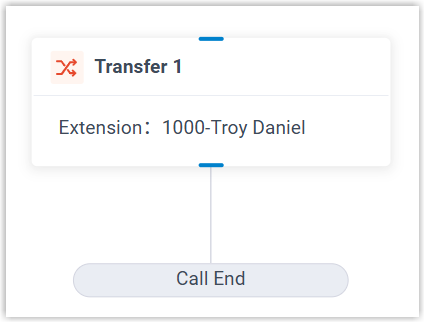
The selected destination will appear on the component.
Hang Up Call
This topic provides an overview of the Hang Up Call component, and describes its configuration as well as supported connections.
Component introduction
Hang Up Call component is one of the end components to terminate caller's connection to the current call flow. When callers are routed to the component, the call will be disconnected.
Condition
This topic provides an overview of the Condition component, and describes its configuration as well as supported connections.
Component introduction
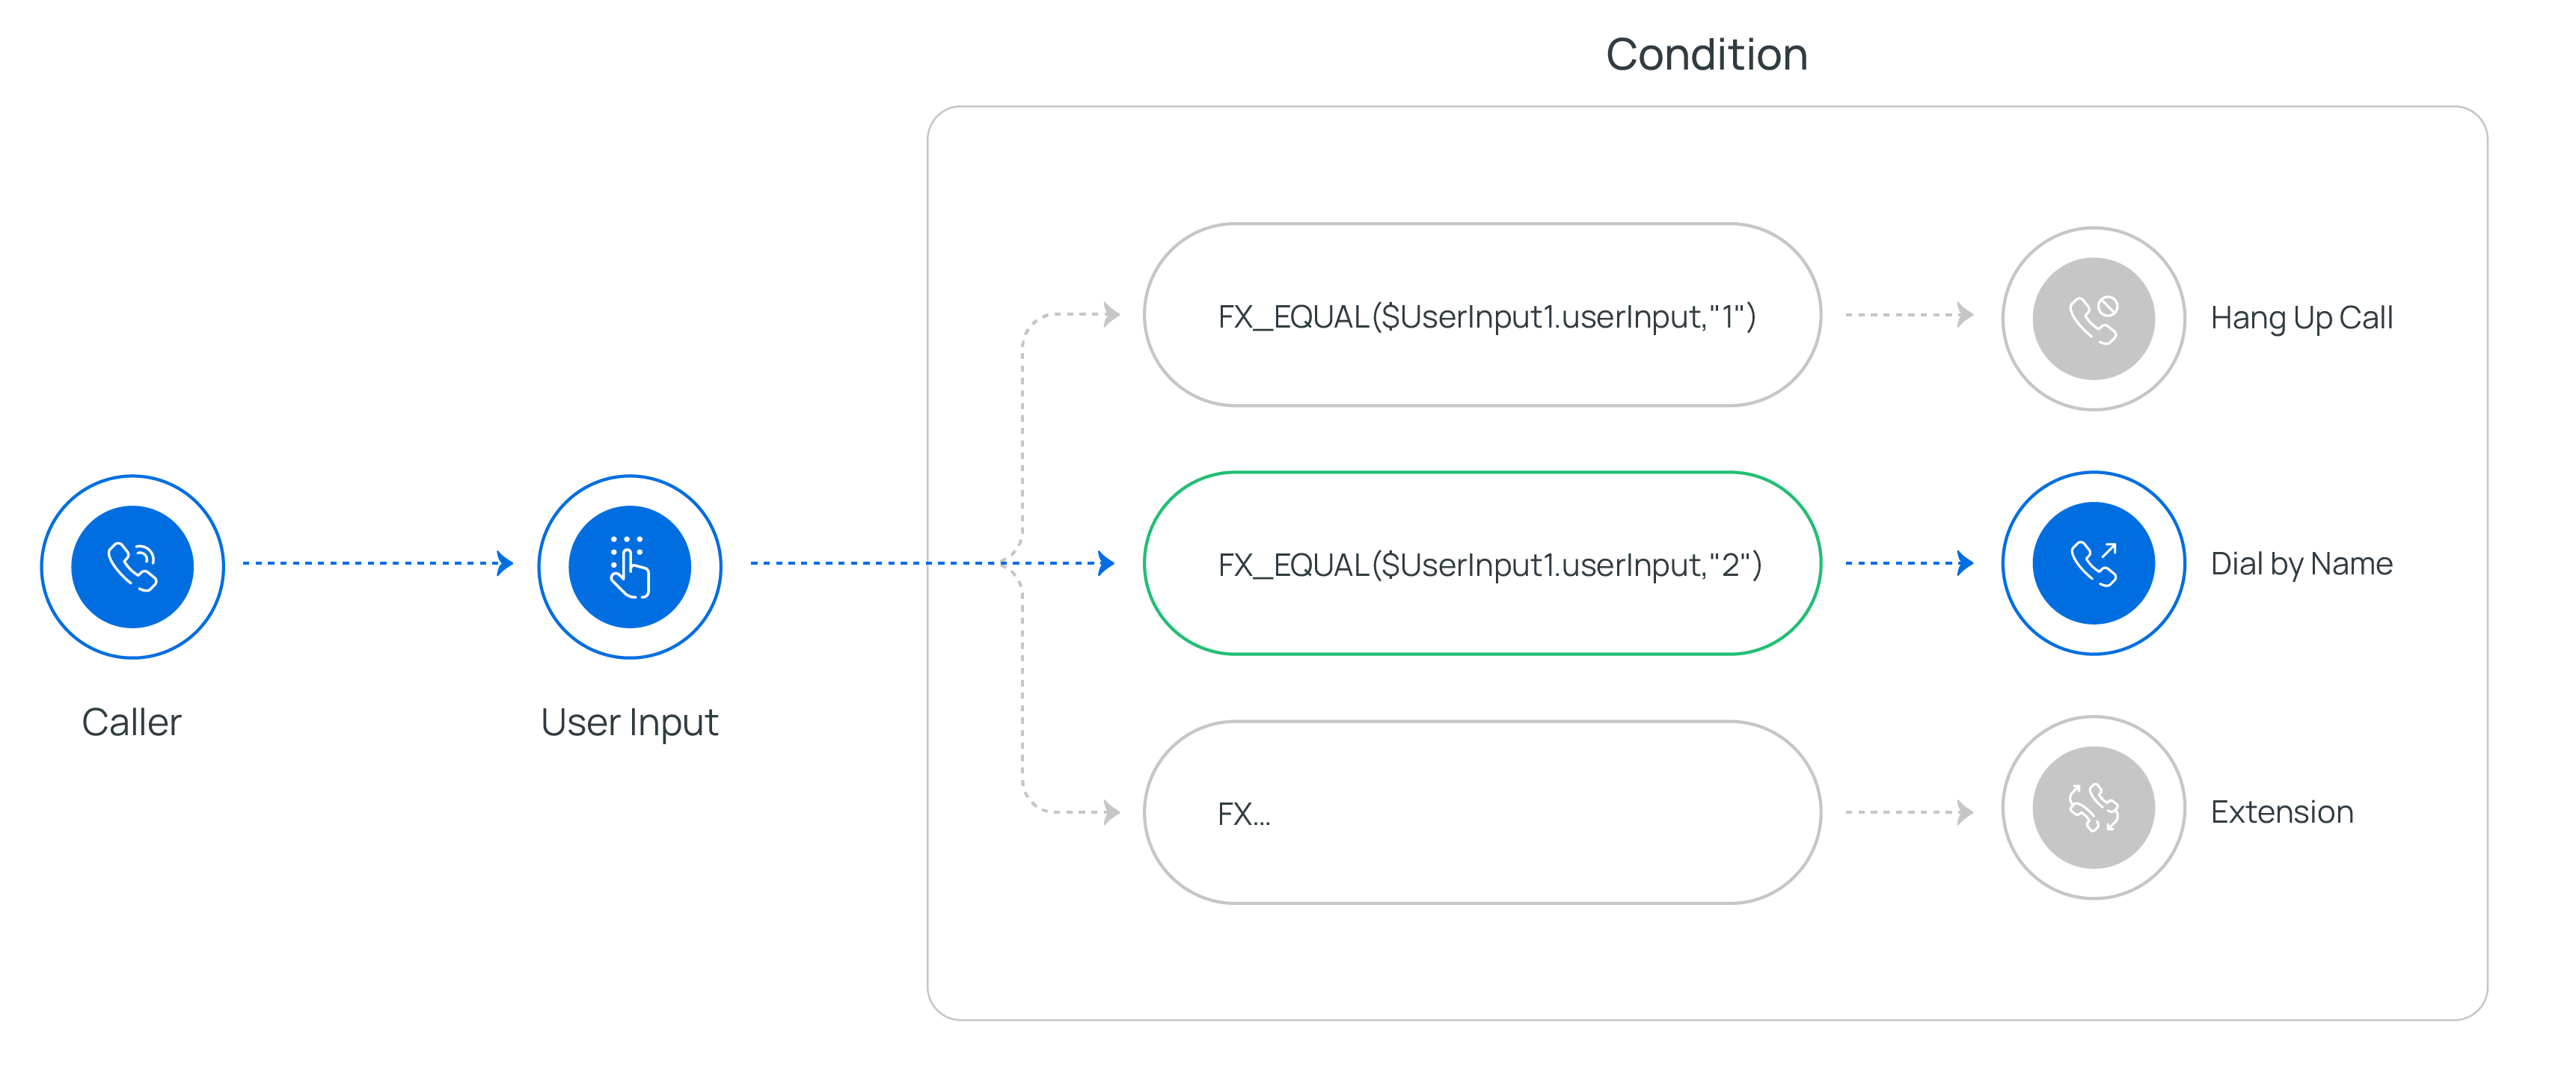
Condition component allows routing calls based on logical expressions. You can use variables, constants, and functions in an expression to evaluate specific conditions. When a condition is met, the call will be routed to the connected component.
Component configuration
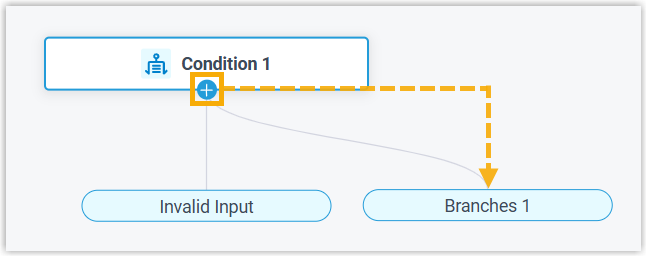
After adding Condition component to a call flow, you can configure branches with expressions to route calls based on specific conditions.- Add branch(es) for different conditions
- Click on the component to add a branch.Note:You can add up to 10 branches, each associated with a unique expression.
- Click the branch to configure expression, then click Confirm.
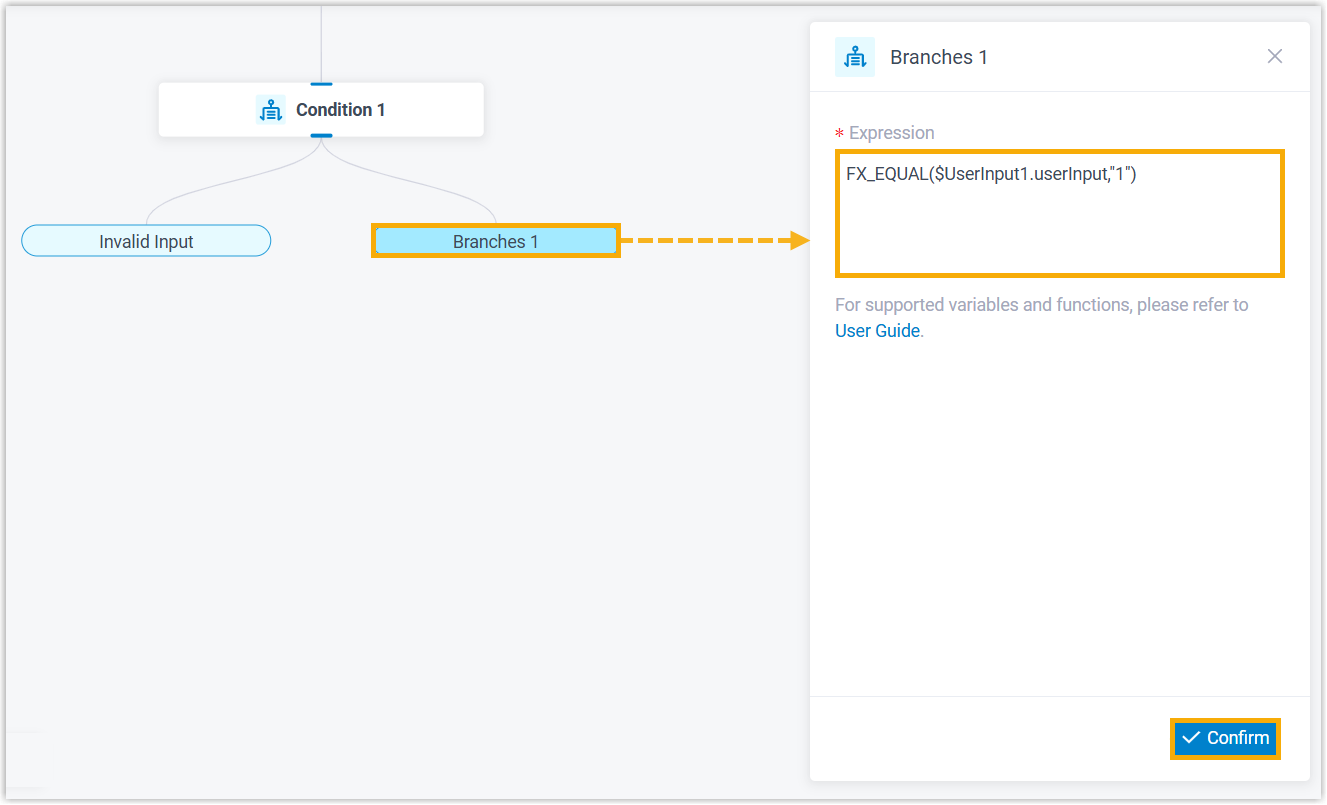
For example, enter FX_EQUAL($UserInput1.userInput,"1"). In this way, if the caller presses 1, the call will be routed to the component connected to the branch.
Note:For more information about the expression, see Variables and Functions in Yeastar Expression.
- Specify destination for invalid input
- Click on Invalid Input to add a component, which will be executed if none of the branch conditions are met.

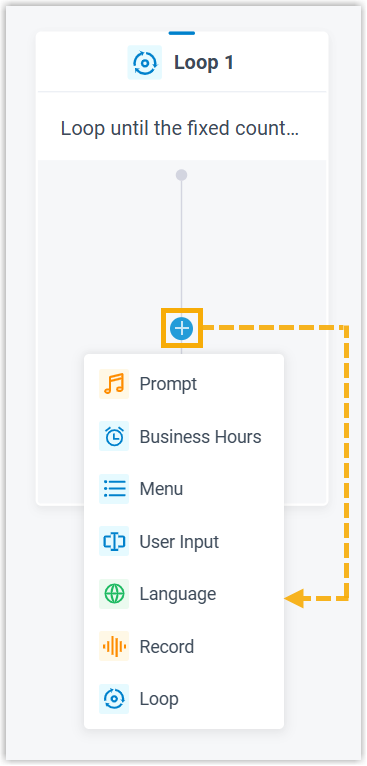
Loop
This topic provides an overview of the Loop component, and describes its configuration as well as supported connections.
Component introduction
Loop component allows a group of components to be executed repeatedly, either for a specified number of times or until a condition is met, helpful in repeating menu options or returning to the previous menu.
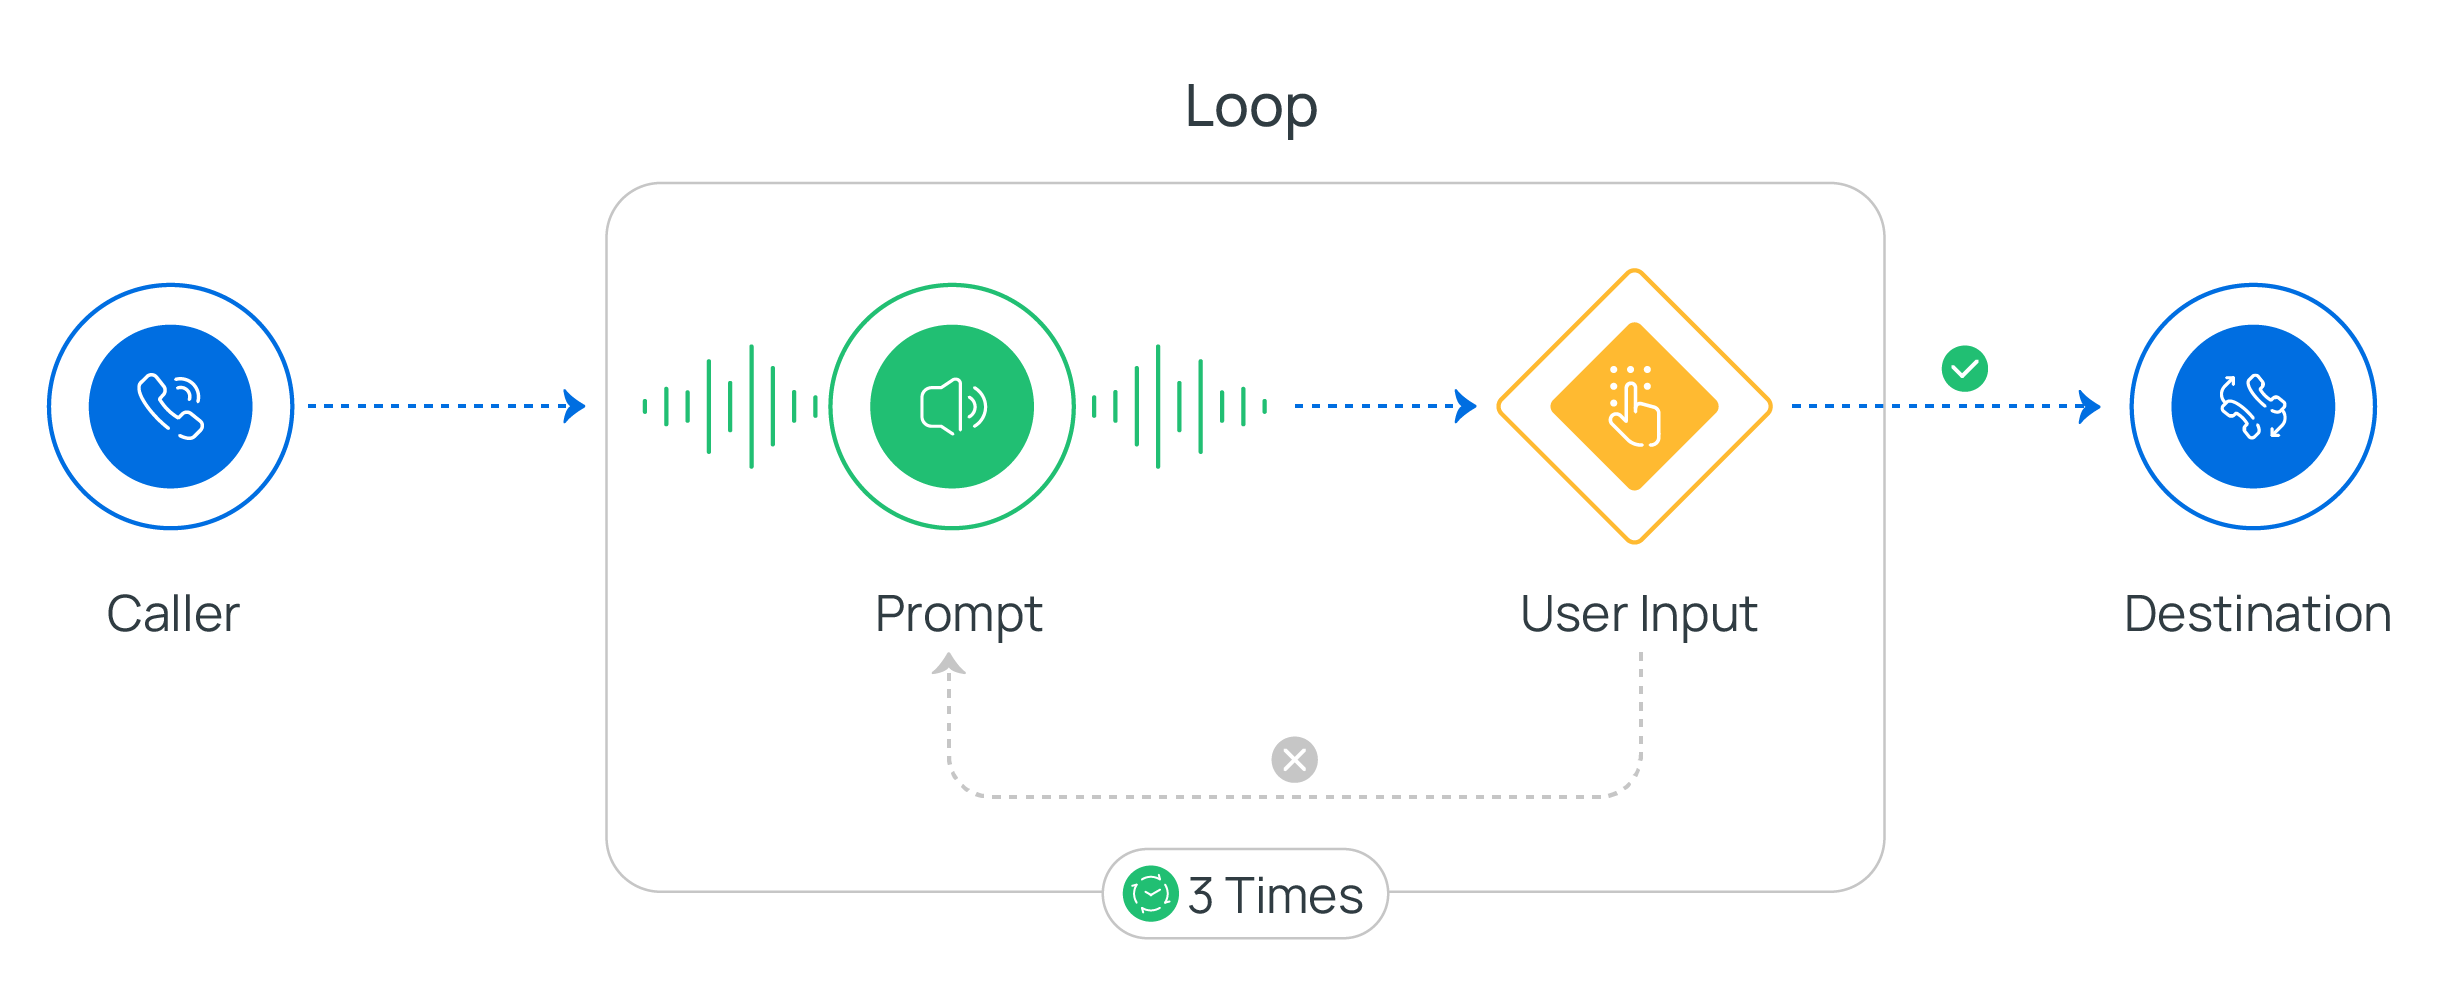
Component configuration
- After adding Loop component to a call flow, click Loop component to proceed with the configuration.
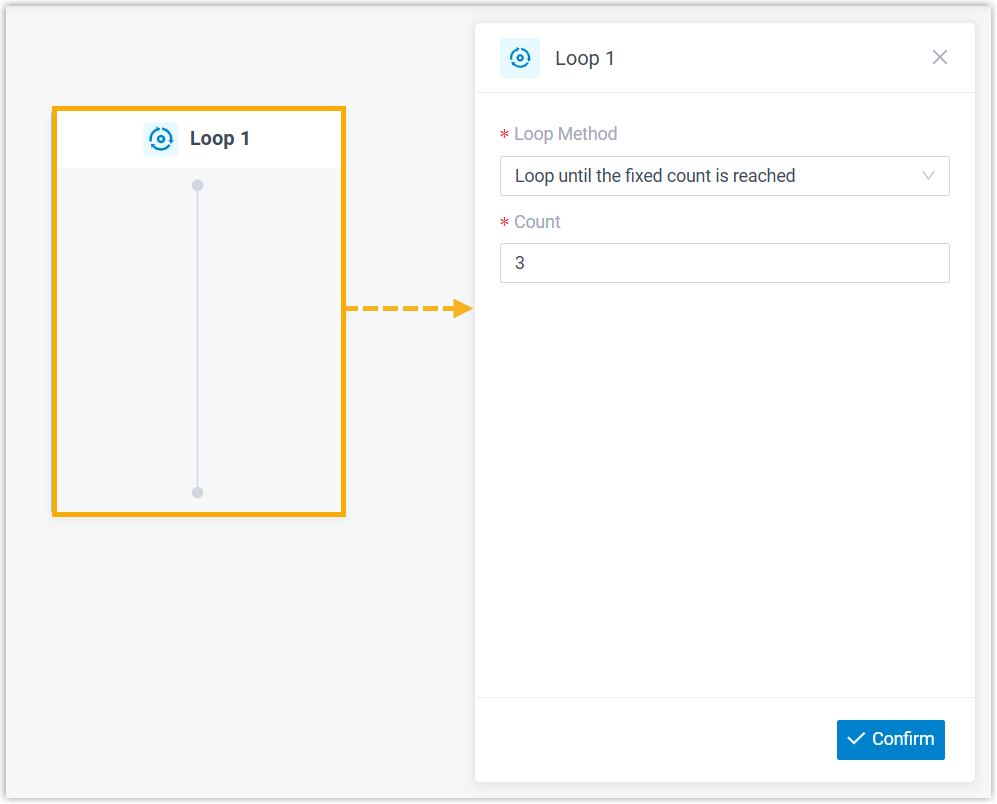
- Set the loop method, then click Confirm.
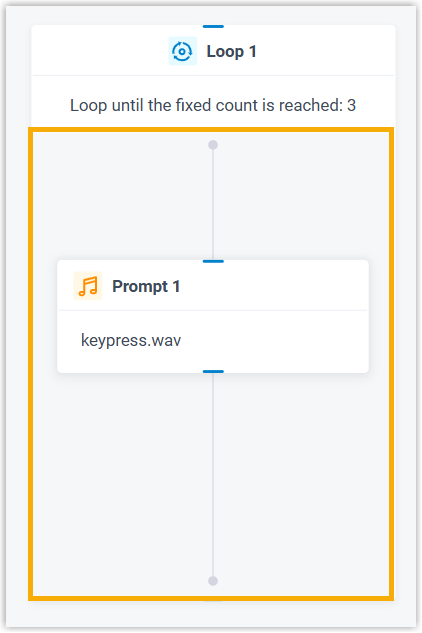
Loop Method Description Loop until the fixed count is reached 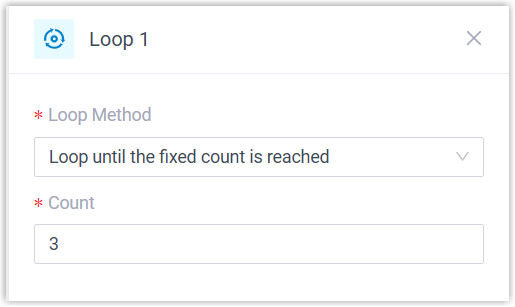
- In the Loop Method drop-down list, select Loop until the fixed count is reached.
- In the Count field, specify how many times the loop should repeat.Note:You can enter a value between 1 and 99.
Loop while condition is true 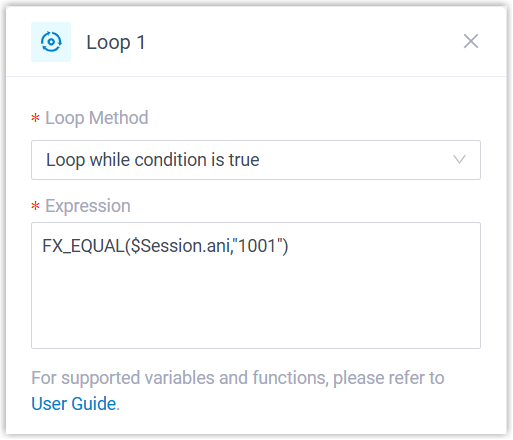
- In the Loop Method drop-down list, select Loop while condition is true.
- In the Expression field, enter a function.
Example: FX_EQUAL($Session.ani,"1001")
In this example, a call will enter the loop when the Caller ID is 1001.
For more information about the function syntax, see Variables and Functions in Yeastar Expression.
- Click inside the loop to add the components that you want to repeat.Note:If you add a nested Loop component, up to 3 levels of nesting are supported.
The components to be repeated will appear inside the Loop component.
Related Articles
Yeastar - Call Flow Designer - New Setup
Set up a Call Flow from Scratch You can build a call flow from the ground up, with full control over each component to meet your business needs. Step 1. Create a call flow from scratch Access the creation page of call flow. Log in to PBX web portal, ...Yeastar - Holiday Call Flow
Holiday Call Flow This topic describes how to create holidays for a specific time zone by date, week, and month. Create a holiday by date Creating a holiday by date. Example: Christmas and boxing day fall on the same dates each year 25th and 26th ...Yeastar - Call Recording Minutes
Yeastar Call Recording Minutes Understanding Yeastar Call Recording Yeastar Call Recording Minutes are allocated to the system Call Recording Minutes account for both the recording and the storage of the recordings on the local drive of the system ...Yeastar - 4G and Wifi Handover - Call Loss
4G and Wifi Handover - Call Loss Issue Call handover between cellular and WiFi network Status Identified that the linkus app is not able to handle switching between IPV4 and IPV6 networks. Calls attempting to handover between IPv4 and IPv6 will ...Yeastar - PRIORITY RING - Fanvil Incoming Call Disconnects Outbound
Fanvil Incoming Call Disconnects Outbound Identified on incoming call on Fanvil handsets, when attempting to complete an outbound call, if a second call rings through to handset the outbound call will be dropped forcing the caller to take the inbound ...